Apple has taken crucial steps to protect the privacy of their customers by implementing features that help users control their data. Unfortunately, this came at a huge cost to digital advertisers all over the world.
We’ve talked about these issues before in a previous post about iOS14 — so this isn’t a new topic. Just a topic that is lingering and one many marketers are still trying to tackle.
With the latest iOS releases, as advertisers, we are still seeing negative impacts on our Facebook campaigns. Not only are we seeing below-average performance, we’re often forced to rely on data several hours old.
The problems:
- Audiences became less accurate, so we can’t rely on native ad network tools anymore.
- Many third-party attribution services update data too slowly to make accurate decisions.
- Media buyers waste time checking multiple sources of truth before making a decision.
Outdated Data, Wasted Time, and Tab-Dancing
Right now, many Facebook advertisers are using attribution systems, Shopify sales reports, or Google Analytics to track the performance of their Facebook campaigns.
This leads to tab-dancing — a practice, where users endlessly jump between their data source and Facebook. In the end, advertisers burn valuable time trying to manage accounts using data that’s often hours old.
The result is wasted ad spend, missed opportunities, or worse, errors caused by delayed attribution. But this problem is not unsolvable.
In this article, we'll show you how to receive accurate attribution data with Custom Metrics — a Revealbot feature that lets you pull accurate and up-to-date external data and use it in automations.
With custom metrics, combined with UTMs and Google Analytics, you can:
- Close the time gap. Create Revealbot automations based on information that’s only an hour old — which is better than most attribution systems out there.
- Track almost any metric. Pull metrics that are most relevant to your marketing strategy. Even if they are unsupported by advertising networks natively.
- Save time and reduce hussle. Eliminate tab-dancing entirely and focus on one reliable source of truth.
Adding UTMs to Your Ads
The first step to more accurate attribution data is to set up a UTM strategy. If you’re not tracking your ads using UTMs, you should be — UTMs are more accurate than Facebook’s native reporting.
Open up your business manager, navigate to your ads tab, click edit, and scroll down in your ad to where it says “tracking”.
Once you’re there, click “build a URL Parameter” to create your UTM. Your page should look like this:
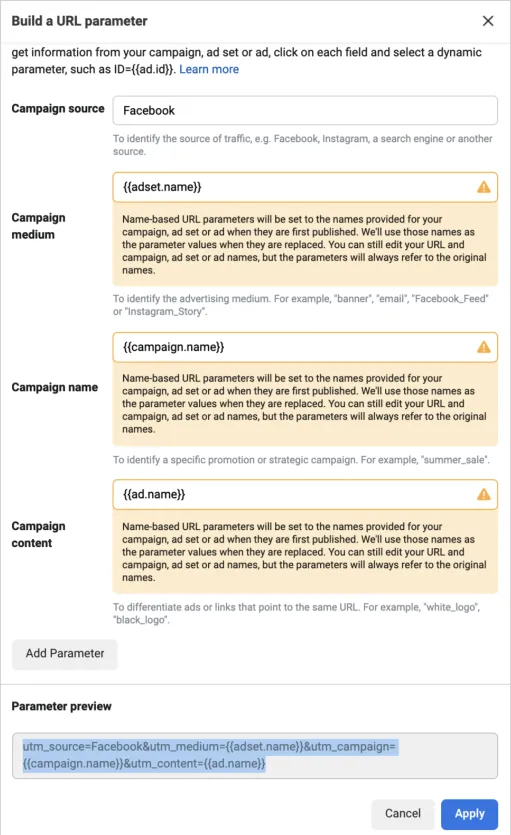
Here’s how to fill in the form.
- Campaign Source: Facebook (or name it after the client's account: “Client FB Ads”)
- Campaign Medium: {{adset.name}}
- Campaign Name: {{campaign.name}}
- Campaign Content: {{ad.name}}
Your resulting UTM Code should look as follows:
utm_source=Facebook&utm_medium={{adset.name}}&utm_campaign={{campaign.name}}&utm_content={{ad.name}}
After completing this step, select all your ads and add your URL in the UTM section in the tracking section of each ad. Now that you’ve added UTMs, it’s time to track your results in Google Analytics.
Tracking UTMs in Google Analytics
Once you’ve added UTM’s into your Facebook ads, it’s time to set up your reports in Google Analytics. Navigate to the Acquisition tab, select All Traffic, and from there select Channels.
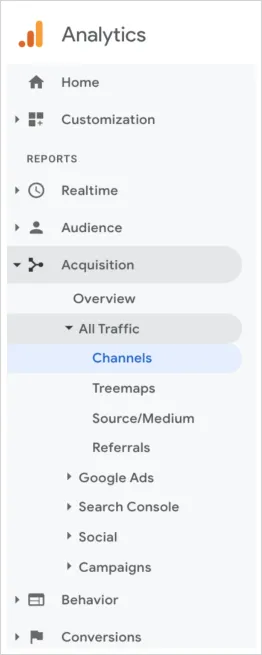
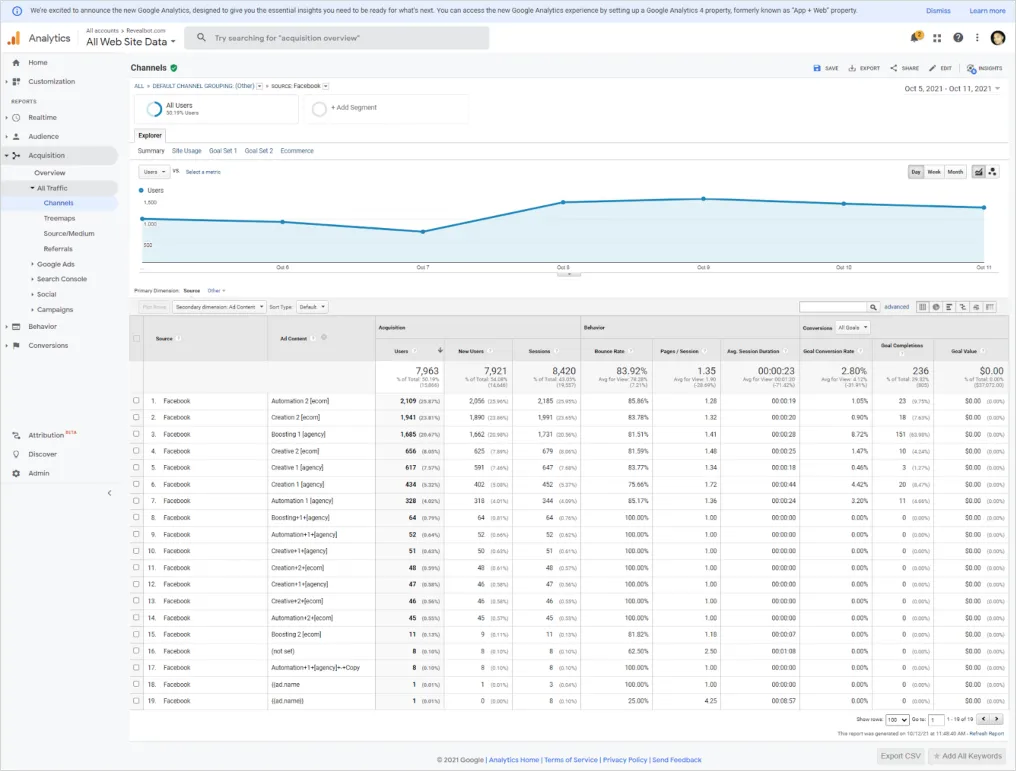
Then, select Primary Dimension and select Campaign. This will show you your Facebook campaign performance. Pretty cool right? From here it’s all about the dropdowns.
Select Secondary Dimension and Medium to show your ad set performance. And finally, to view your ad performance, click Secondary Dimension again, and select Content. Now we can view all your ads in one spot. Awesome. Now let’s move that into an automated report.
Getting Attribution data from Google Analytics with Sheets
First, open a new Sheet in Google Sheets. Go to Add-ons and select Get Add-ons. Search for Google Analytics, make sure you’re logged in correctly, and voila — your Google Analytics info can now be pushed into a sheet.
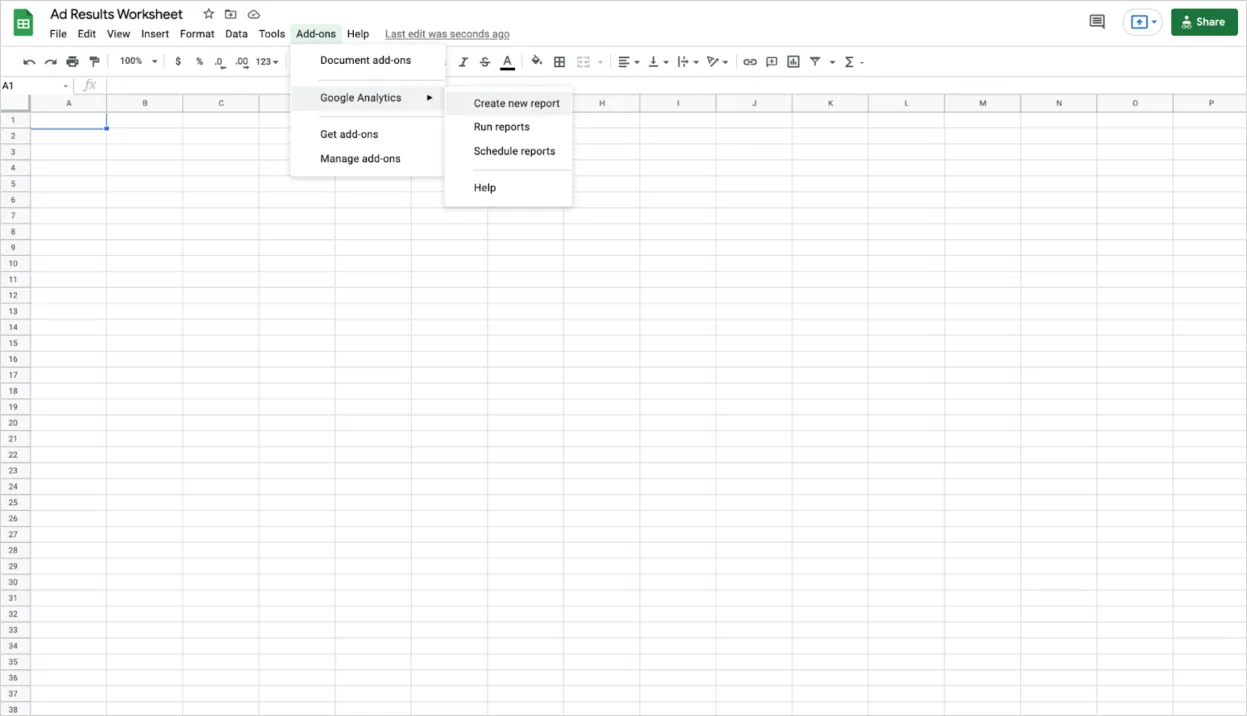
Here’s where the fun begins.
But first, a word of caution. Make sure that each report pulls information from a different stage of the funnel. Each report you make from the home page in the report will live in a new tab, so we suggest you make a report for Campaigns, Ad Sets, and ads.
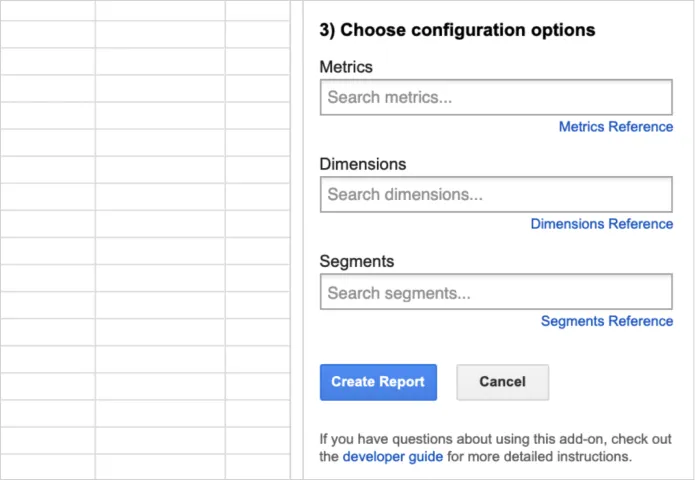
Start by selecting the metrics you want to measure. This can be ROAS, CPC, Purchases — anything you want. Then select the Dimension. In this case, the Dimension refers to the stage — just make sure one campaign, medium, or content is selected for each report. Then go down to Segment and select all users.
Hit “Run Report” to activate the report. Now you have a recurring report that will pull in the metrics you want, sorted by funnel stage. Awesome, they are ready to power your automations.
Before going to the next step, make sure the report is shareable and readable so it’ll integrate with Revealbot properly.
Using the Data in Revealbot
Now we come to the third and final step — setting up the rules in Revealbot. Navigate to the relevant rule (or build one from scratch), select a metric from the drop-down, and select “create custom metric” from the menu.
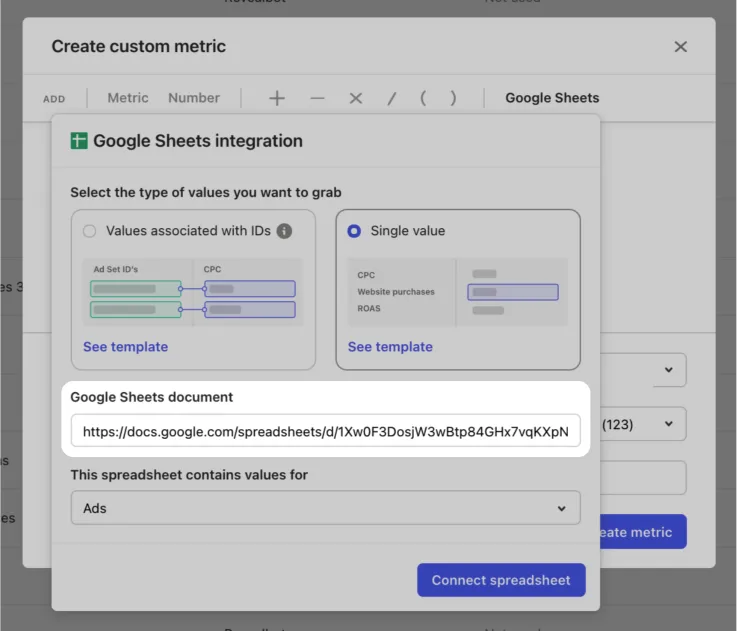
Drop the link to your report into the window. Then, select the relevant tab, then the cell, name your metric, and voila! You have a custom metric.
Now that you’ve eliminated the tab-dancing process using Revealbot’s Google Sheets integration, you can get on to other tasks, take on more ad accounts, and accurately scale your account. Congratulations!
Conclusion
Time constraints have probably held you back from fully implementing the benefits of your reporting tools. The trade-off was either to scale based on what Facebook says, or to wait and potentially miss an opportunity.
With custom metrics pulled from a Google Sheet, you can create automations using accurate, up-to-date information. And if you feel like you need help building your Custom Metrics, feel free to book a demo here and we will walk you through the whole set-up process.
Key Insights
- Apple has implemented privacy features to empower users to control their data, but these measures have adversely affected digital advertisers, resulting in significant challenges mostly regarding tracking ads data.
- There's a system where you can circumvent and track data usign Google analytics, UTMs and Google sheets
- The data inside Google sheets can be used to create custom metrics inside Revealbot that can either be used to create custom reports as well as rules to automate your ads.
Apple has taken crucial steps to protect the privacy of their customers by implementing features that help users control their data. Unfortunately, this came at a huge cost to digital advertisers all over the world.
We’ve talked about these issues before in a previous post about iOS14 — so this isn’t a new topic. Just a topic that is lingering and one many marketers are still trying to tackle.
With the latest iOS releases, as advertisers, we are still seeing negative impacts on our Facebook campaigns. Not only are we seeing below-average performance, we’re often forced to rely on data several hours old.
The problems:
- Audiences became less accurate, so we can’t rely on native ad network tools anymore.
- Many third-party attribution services update data too slowly to make accurate decisions.
- Media buyers waste time checking multiple sources of truth before making a decision.
Outdated Data, Wasted Time, and Tab-Dancing
Right now, many Facebook advertisers are using attribution systems, Shopify sales reports, or Google Analytics to track the performance of their Facebook campaigns.
This leads to tab-dancing — a practice, where users endlessly jump between their data source and Facebook. In the end, advertisers burn valuable time trying to manage accounts using data that’s often hours old.
The result is wasted ad spend, missed opportunities, or worse, errors caused by delayed attribution. But this problem is not unsolvable.
In this article, we'll show you how to receive accurate attribution data with Custom Metrics — a Revealbot feature that lets you pull accurate and up-to-date external data and use it in automations.
With custom metrics, combined with UTMs and Google Analytics, you can:
- Close the time gap. Create Revealbot automations based on information that’s only an hour old — which is better than most attribution systems out there.
- Track almost any metric. Pull metrics that are most relevant to your marketing strategy. Even if they are unsupported by advertising networks natively.
- Save time and reduce hussle. Eliminate tab-dancing entirely and focus on one reliable source of truth.
Adding UTMs to Your Ads
The first step to more accurate attribution data is to set up a UTM strategy. If you’re not tracking your ads using UTMs, you should be — UTMs are more accurate than Facebook’s native reporting.
Open up your business manager, navigate to your ads tab, click edit, and scroll down in your ad to where it says “tracking”.
Once you’re there, click “build a URL Parameter” to create your UTM. Your page should look like this:

Here’s how to fill in the form.
- Campaign Source: Facebook (or name it after the client's account: “Client FB Ads”)
- Campaign Medium: {{adset.name}}
- Campaign Name: {{campaign.name}}
- Campaign Content: {{ad.name}}
Your resulting UTM Code should look as follows:
utm_source=Facebook&utm_medium={{adset.name}}&utm_campaign={{campaign.name}}&utm_content={{ad.name}}
After completing this step, select all your ads and add your URL in the UTM section in the tracking section of each ad. Now that you’ve added UTMs, it’s time to track your results in Google Analytics.
Tracking UTMs in Google Analytics
Once you’ve added UTM’s into your Facebook ads, it’s time to set up your reports in Google Analytics. Navigate to the Acquisition tab, select All Traffic, and from there select Channels.

Then, select Primary Dimension and select Campaign. This will show you your Facebook campaign performance. Pretty cool right? From here it’s all about the dropdowns.
Select Secondary Dimension and Medium to show your ad set performance. And finally, to view your ad performance, click Secondary Dimension again, and select Content. Now we can view all your ads in one spot. Awesome. Now let’s move that into an automated report.

Getting Attribution data from Google Analytics with Sheets
First, open a new Sheet in Google Sheets. Go to Add-ons and select Get Add-ons. Search for Google Analytics, make sure you’re logged in correctly, and voila — your Google Analytics info can now be pushed into a sheet.

Here’s where the fun begins.
But first, a word of caution. Make sure that each report pulls information from a different stage of the funnel. Each report you make from the home page in the report will live in a new tab, so we suggest you make a report for Campaigns, Ad Sets, and ads.

Start by selecting the metrics you want to measure. This can be ROAS, CPC, Purchases — anything you want. Then select the Dimension. In this case, the Dimension refers to the stage — just make sure one campaign, medium, or content is selected for each report. Then go down to Segment and select all users.
Hit “Run Report” to activate the report. Now you have a recurring report that will pull in the metrics you want, sorted by funnel stage. Awesome, they are ready to power your automations.
Before going to the next step, make sure the report is shareable and readable so it’ll integrate with Revealbot properly.
Using the Data in Revealbot
Now we come to the third and final step — setting up the rules in Revealbot. Navigate to the relevant rule (or build one from scratch), select a metric from the drop-down, and select “create custom metric” from the menu.

Drop the link to your report into the window. Then, select the relevant tab, then the cell, name your metric, and voila! You have a custom metric.
Now that you’ve eliminated the tab-dancing process using Revealbot’s Google Sheets integration, you can get on to other tasks, take on more ad accounts, and accurately scale your account. Congratulations!
Conclusion
Time constraints have probably held you back from fully implementing the benefits of your reporting tools. The trade-off was either to scale based on what Facebook says, or to wait and potentially miss an opportunity.
With custom metrics pulled from a Google Sheet, you can create automations using accurate, up-to-date information. And if you feel like you need help building your Custom Metrics, feel free to book a demo here and we will walk you through the whole set-up process.
Key Insights
- Apple has implemented privacy features to empower users to control their data, but these measures have adversely affected digital advertisers, resulting in significant challenges mostly regarding tracking ads data.
- There's a system where you can circumvent and track data usign Google analytics, UTMs and Google sheets
- The data inside Google sheets can be used to create custom metrics inside Revealbot that can either be used to create custom reports as well as rules to automate your ads.


