Boosting an Instagram post is as easy as clicking a button. Seeing performance is another story.
Learning how to boost Instagram posts the right way can make a huge difference in terms of reach, engagement, and conversions.
In this guide, we’ll walk you through how to boost posts from both the app and desktop, explain why some posts can’t be boosted, and show you how to automate the process with Bïrch (formerly Revealbot).
Key takeaways
- When you boost an Instagram post, it becomes an ad.
- Boosting posts helps you reach more people than just your followers.
- Not all posts are eligible for boosting.
- You can boost posts directly on Instagram or automate them through Bïrch using custom rules.
- Post-boosting works best when you build on content that already performs well.
What does “boost post” mean on Instagram?
Boosting an Instagram post means turning it into an ad to reach more people outside of your follower list.
The feature is designed to help you gain more engagement, reach new potential followers, and effectively promote your content.
How to boost an Instagram post
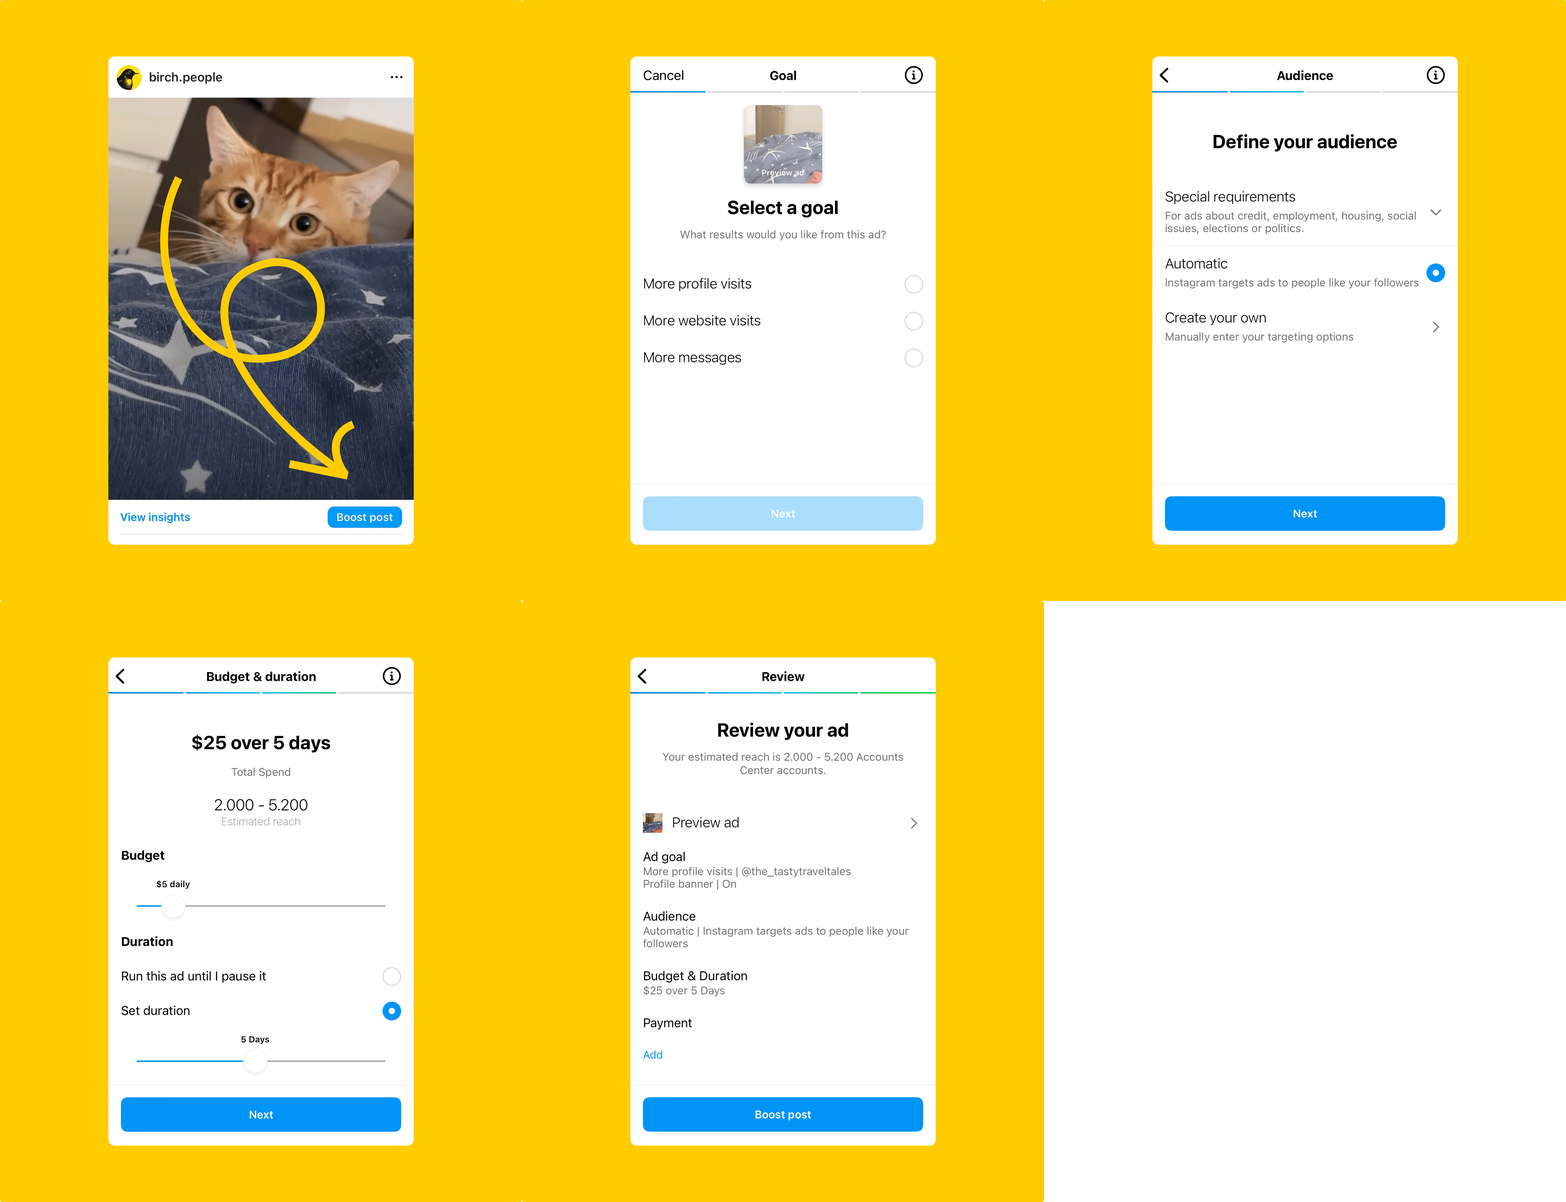
To boost a post, click the “boost post” button under the post you want to promote. You can do this from the Instagram app or on your computer.
How to boost an Instagram post from the Instagram app
- Select the post you want to boost from your Instagram profile.
- Tap “boost post” on the lower right corner of your post
- Set up your goal, audience, budget, and duration.
- Tap “next.”
- Review your details and tap “boost post.”
Your ad will be submitted for review and will start running once approved.
How to boost an Instagram post from your computer
- Click the post you want to boost.
- Below the image, click “boost post.”
- Set up your ad by choosing the goal, audience, budget, and duration.
- Click “preview ad” to see how your post will appear across placements and adjust Advantage+ creative if needed.
- Click “boost post” to submit it for review.
Once approved, your post will start running as an ad.
Why you might not be able to boost a post
Not seeing the “boost post” option on Instagram? Here are a few common reasons why:
- Your account isn’t a professional account or hasn’t existed for at least 30 days.
- The post doesn’t meet Meta ad policies.
- You have account restrictions or ad rejections.
- The post is too old, archived, or already part of another promotion. Instagram may block boosting for content that’s no longer eligible.
- There’s a technical issue.
So, how can you tackle these obstacles?
- Start by confirming that your account is professional and active.
- Try recreating the post if it was archived or used in a past promotion.
- For policy violations, avoid excessive text in images or restricted keywords.
- If your account has been flagged, check the Account Quality section in Meta’s settings.
- If it seems like a glitch, try updating the app, logging out and back in, or reinstalling to refresh access.
Is it worth it to boost a post on Instagram?
Instagram isn’t just where people scroll for entertainment. It’s also where they discover, search, and shop. With two billion monthly users and high-engagement on-brand content, it’s a platform worth showing up on.
When a post performs well organically, it’s a clear sign that your audience is responding to it. Promoting that post helps you reach even more people—people who are likely to engage—bringing in more likes, followers, and visibility for your brand.
It can also drive traffic to your website, generate new leads, or even lead to app installs—especially when paired with the right call to action.
How to auto-boost posts with Bïrch
You can automatically promote Instagram posts when they meet certain conditions (such as quantity of likes or comments) through Bïrch’s post boosting tool.
Follow these steps:
1. Integrate your Instagram accounts
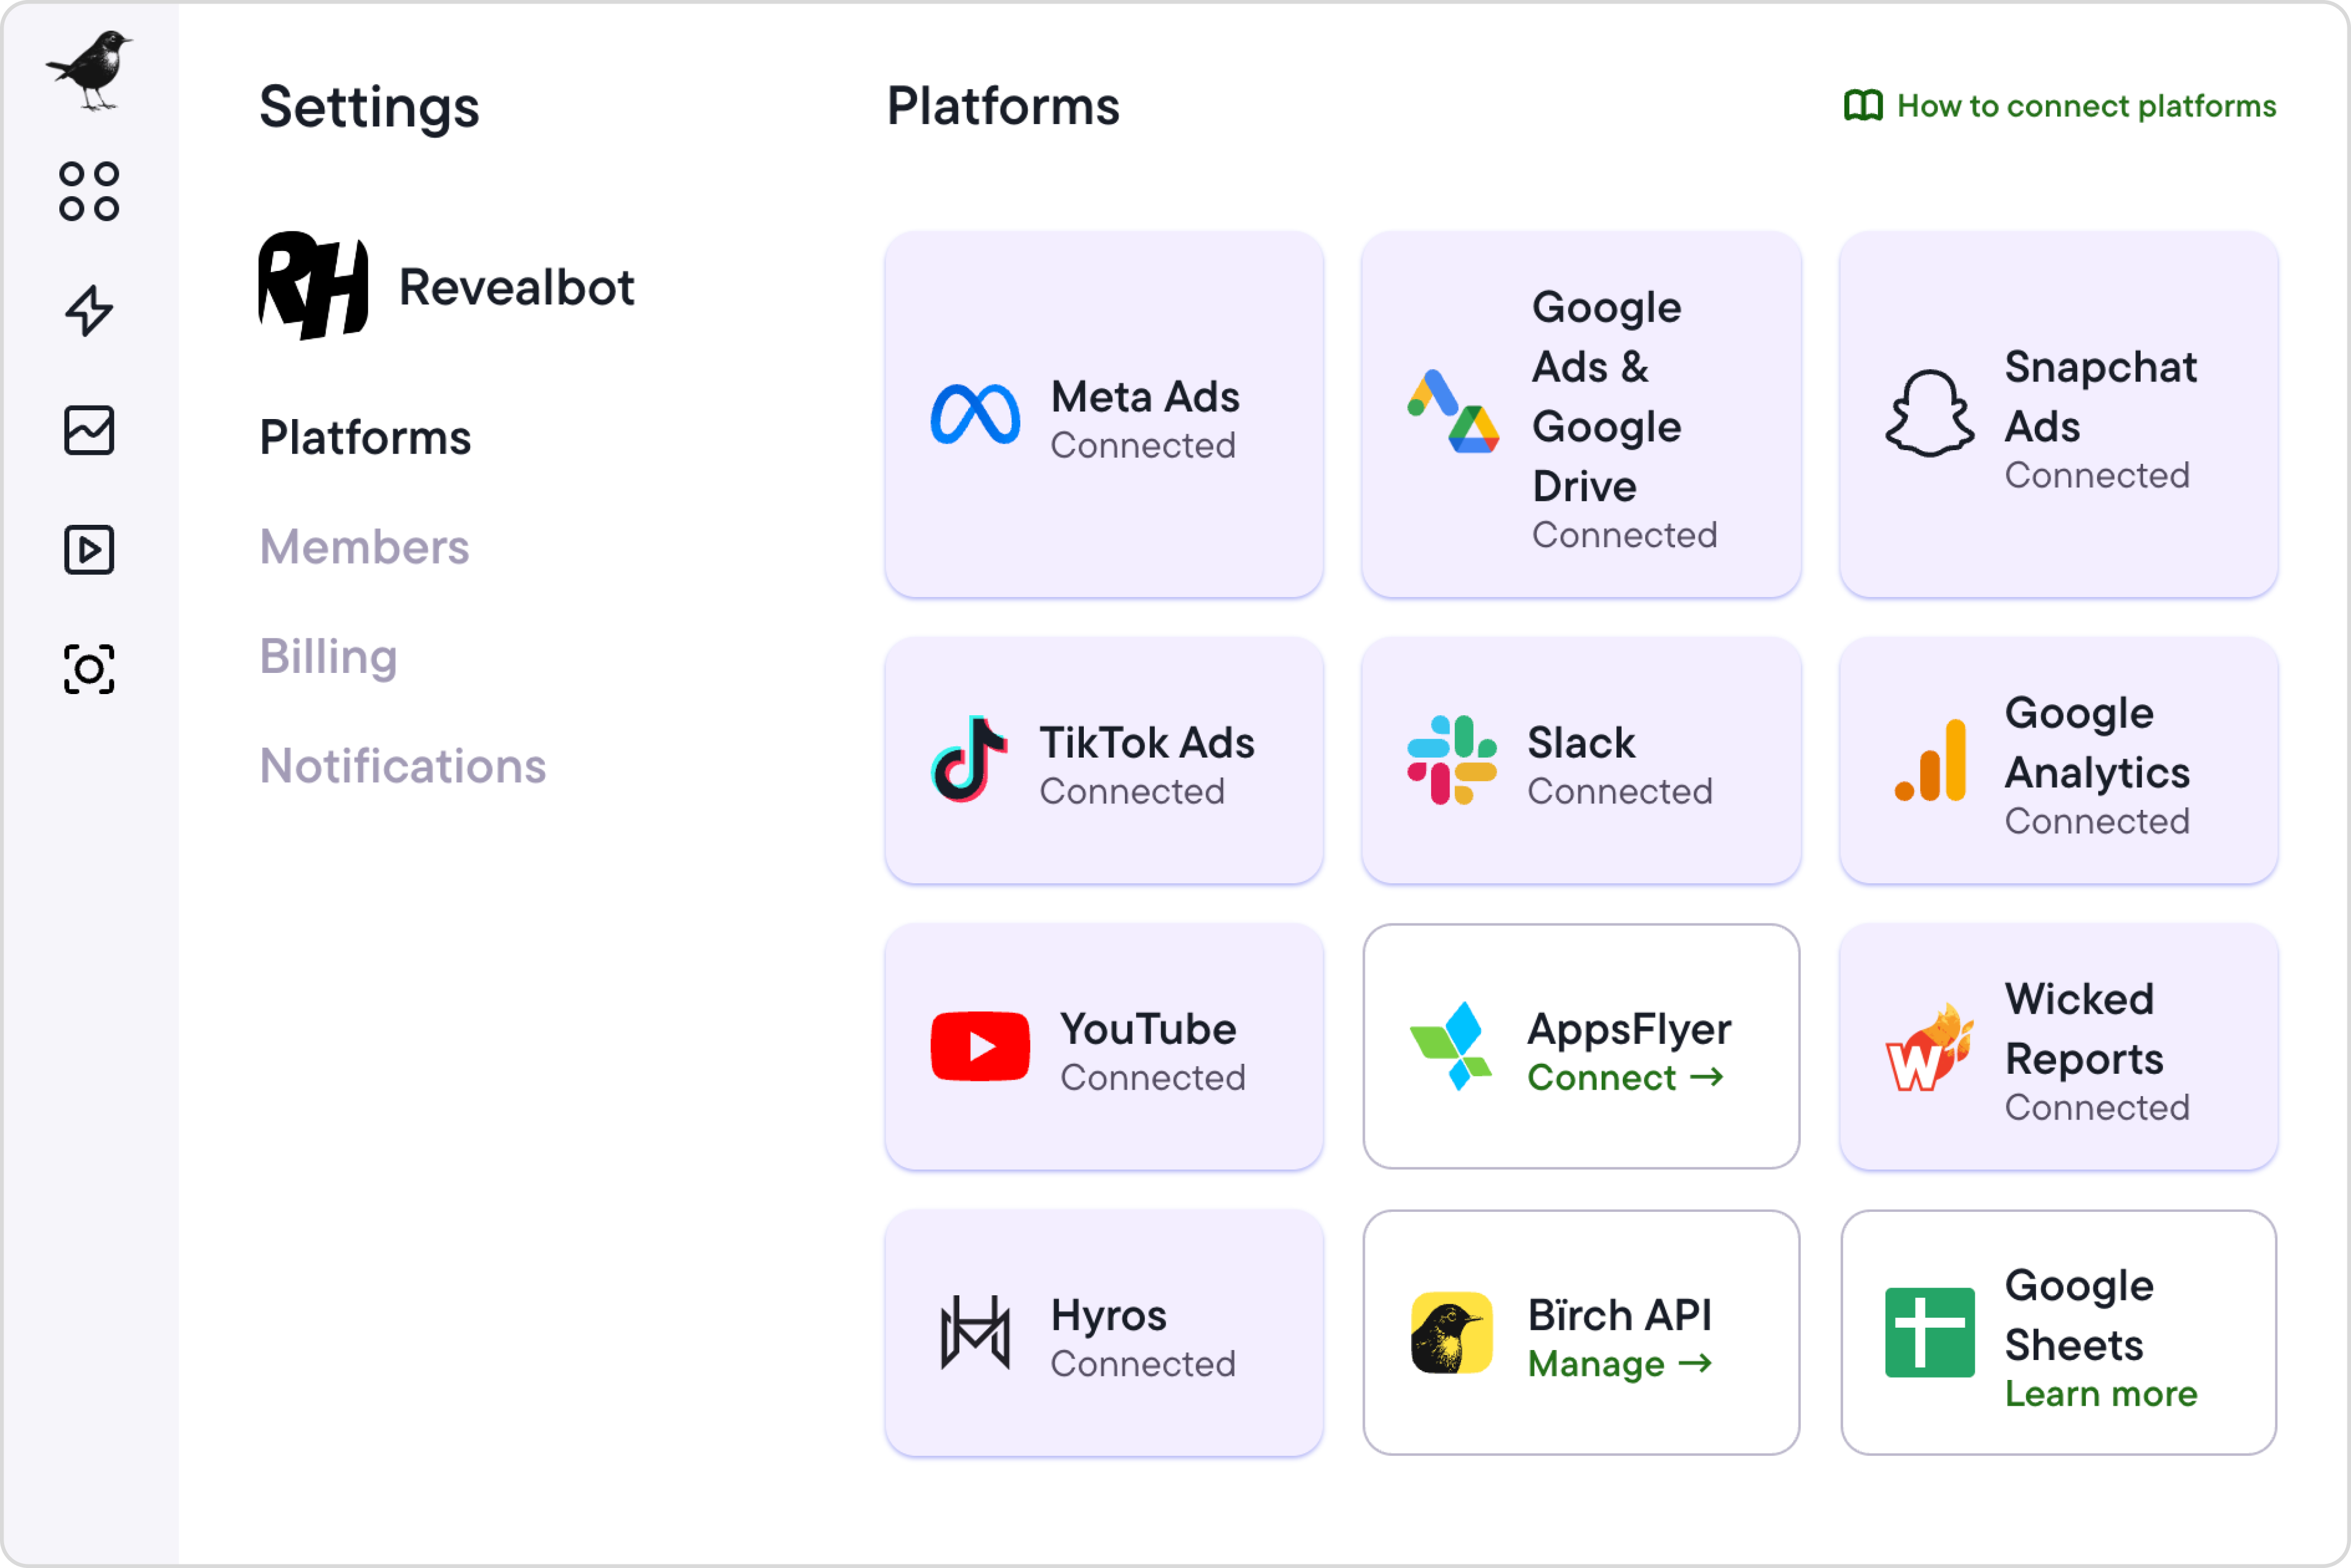
Integrate your Facebook Insights and Instagram accounts. Click your profile icon in the bottom left corner, go to Integrations, and connect your accounts from there
2. Set post boosting conditions
Once you’ve integrated your Facebook Insights and Instagram page, you can set up post boosting. On the left sidebar, click “post boosting” and select “Instagram” under “page source.”
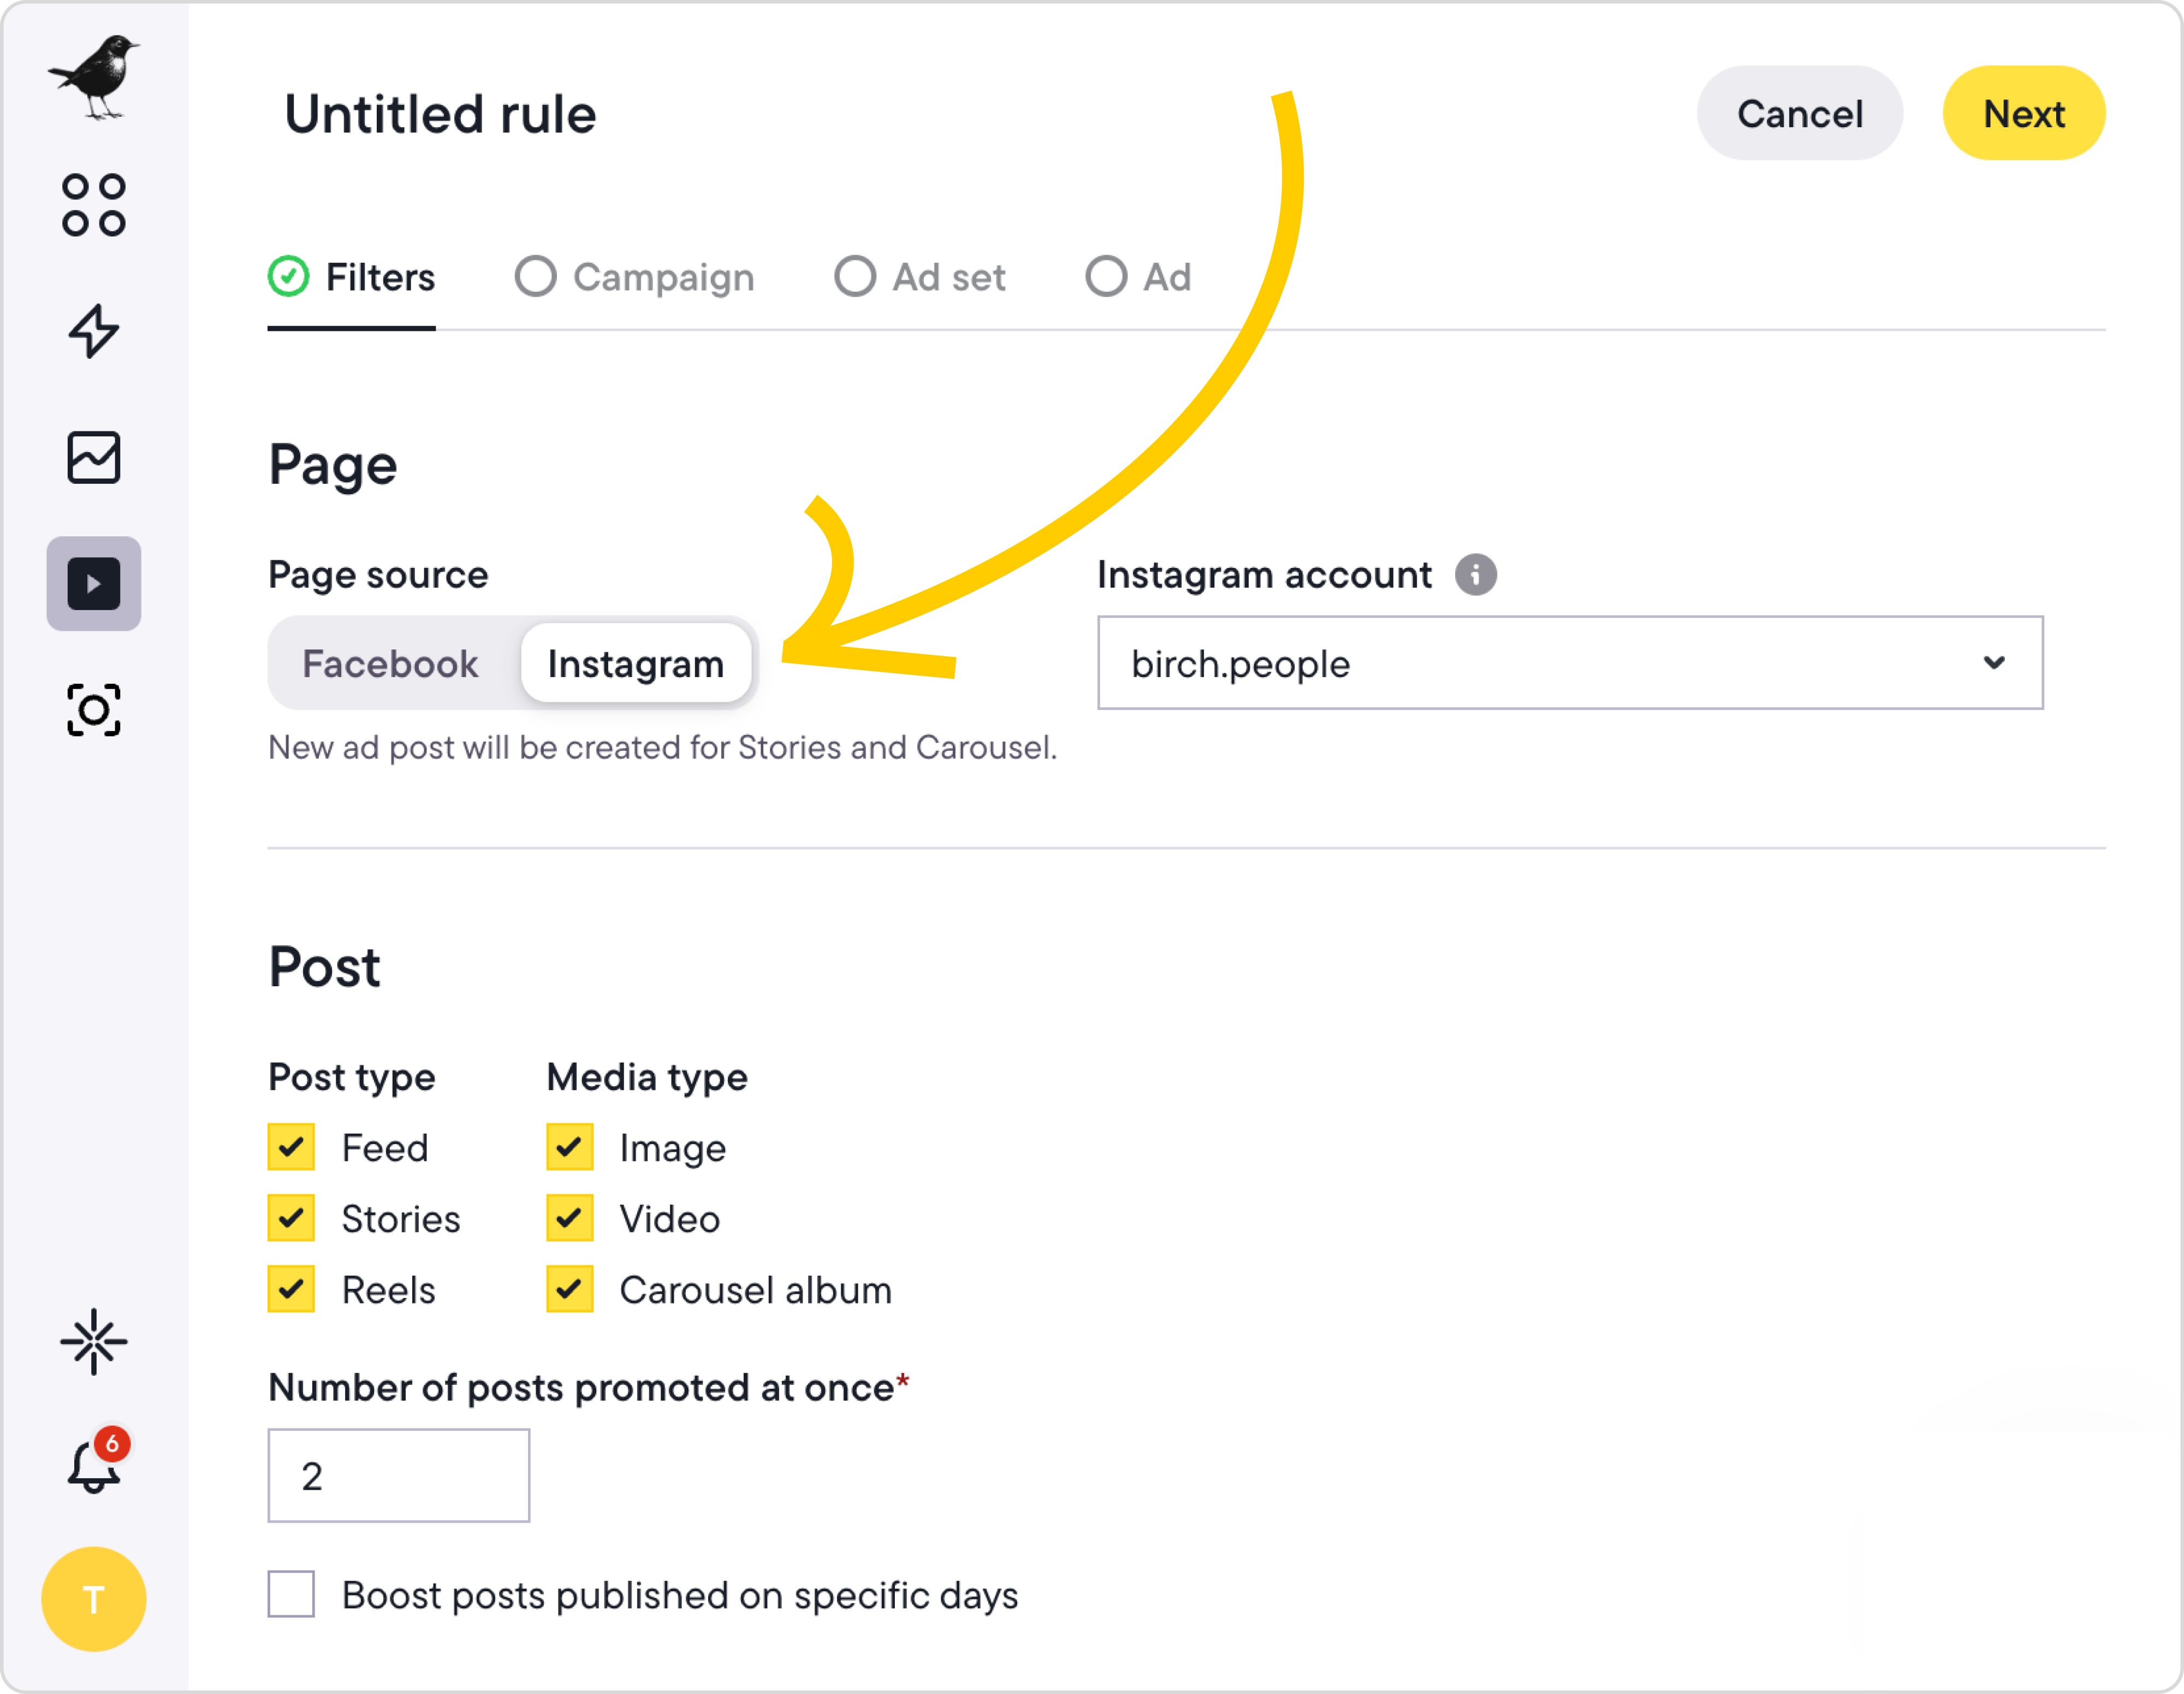
Select your Instagram page from the drop-down menu, then choose which post types to boost—image, Reel, carousel, or Story. You can boost all types, just a few, or only one. If you want more control over the different types of posts that get promoted at the same time, you can adjust that setting.
Depending on the run time you select in the next step (for example, four days), multiple posts may be boosted at the same time. If you want to limit that amount, select the number under “number of posts promoted at once.”
You can choose the conditions a post needs to meet to be eligible for boosting. Select from a variety of criteria, such as total engagement, likes, comments, saves, impressions, whether the post text includes certain words or emojis, how long ago the post was published, and more.
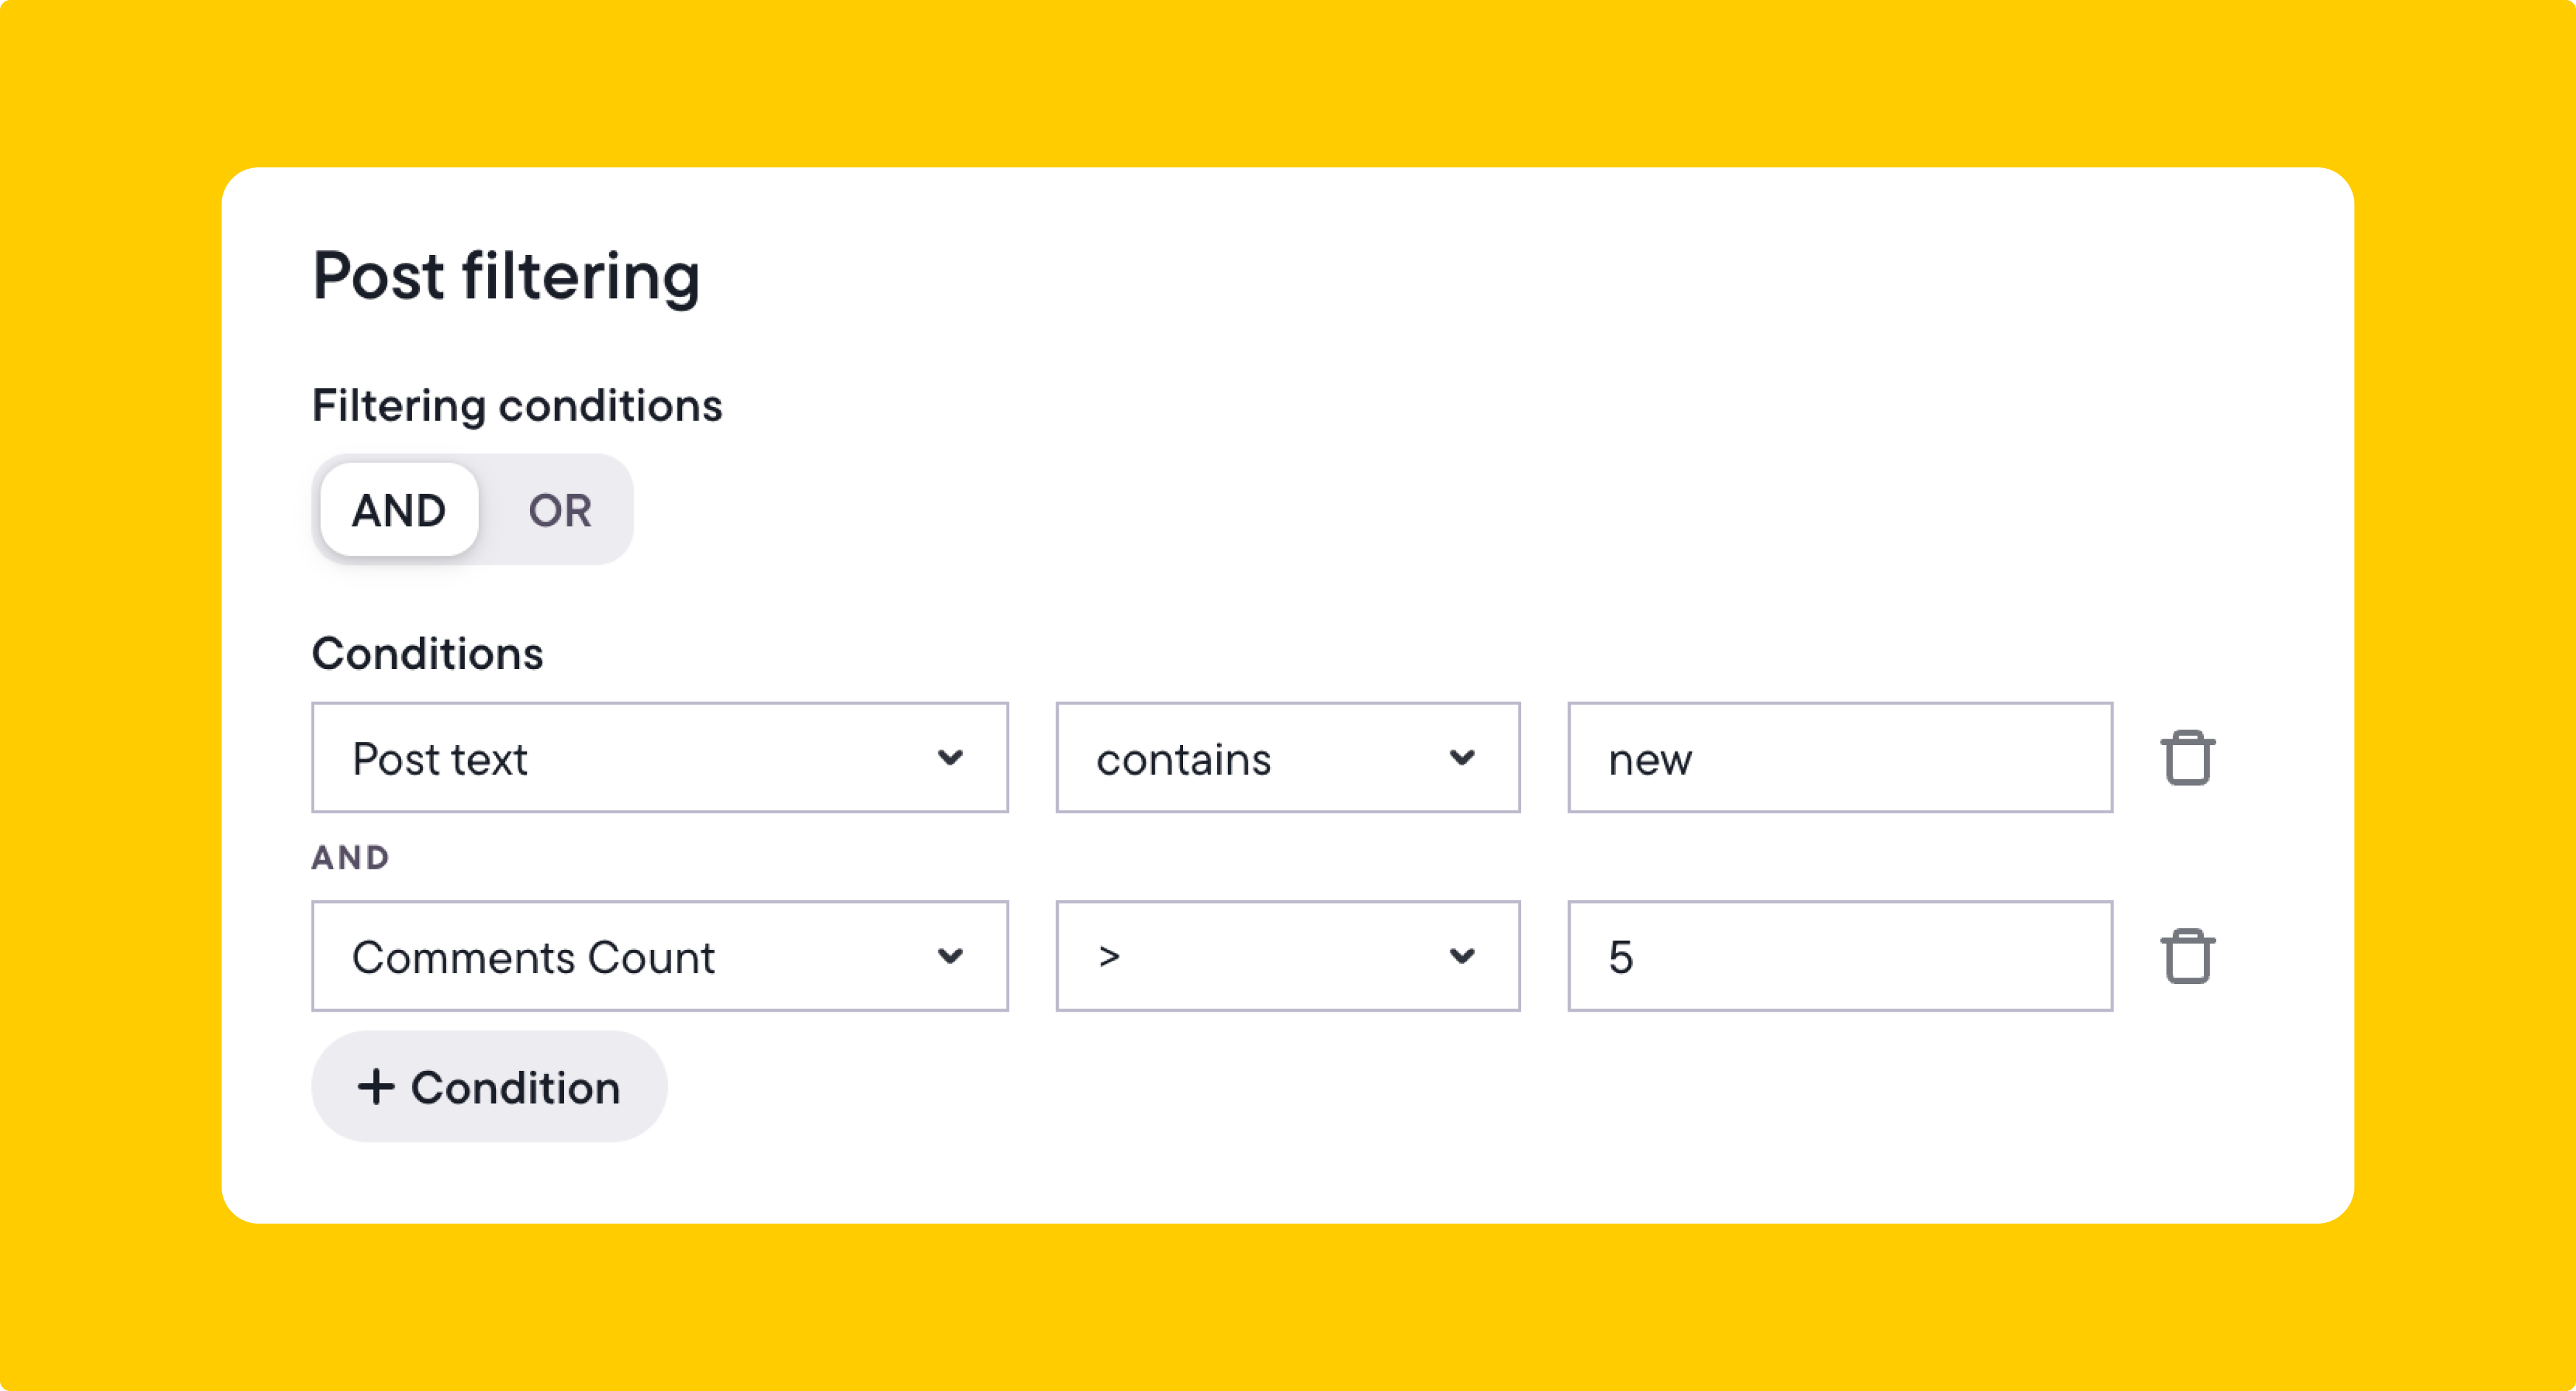
In the example above, we requested to only boost posts that contain the word “new” and have received more than five comments.
Once the rule is active, you can track its performance in the activity logs. You can see which posts were boosted, which didn’t meet the conditions, and if any errors occurred.
3. Set campaign settings
Here, you’ll be able to name your ad campaigns and choose the campaign objective (the Meta ad campaign objective the algorithm will optimize for).
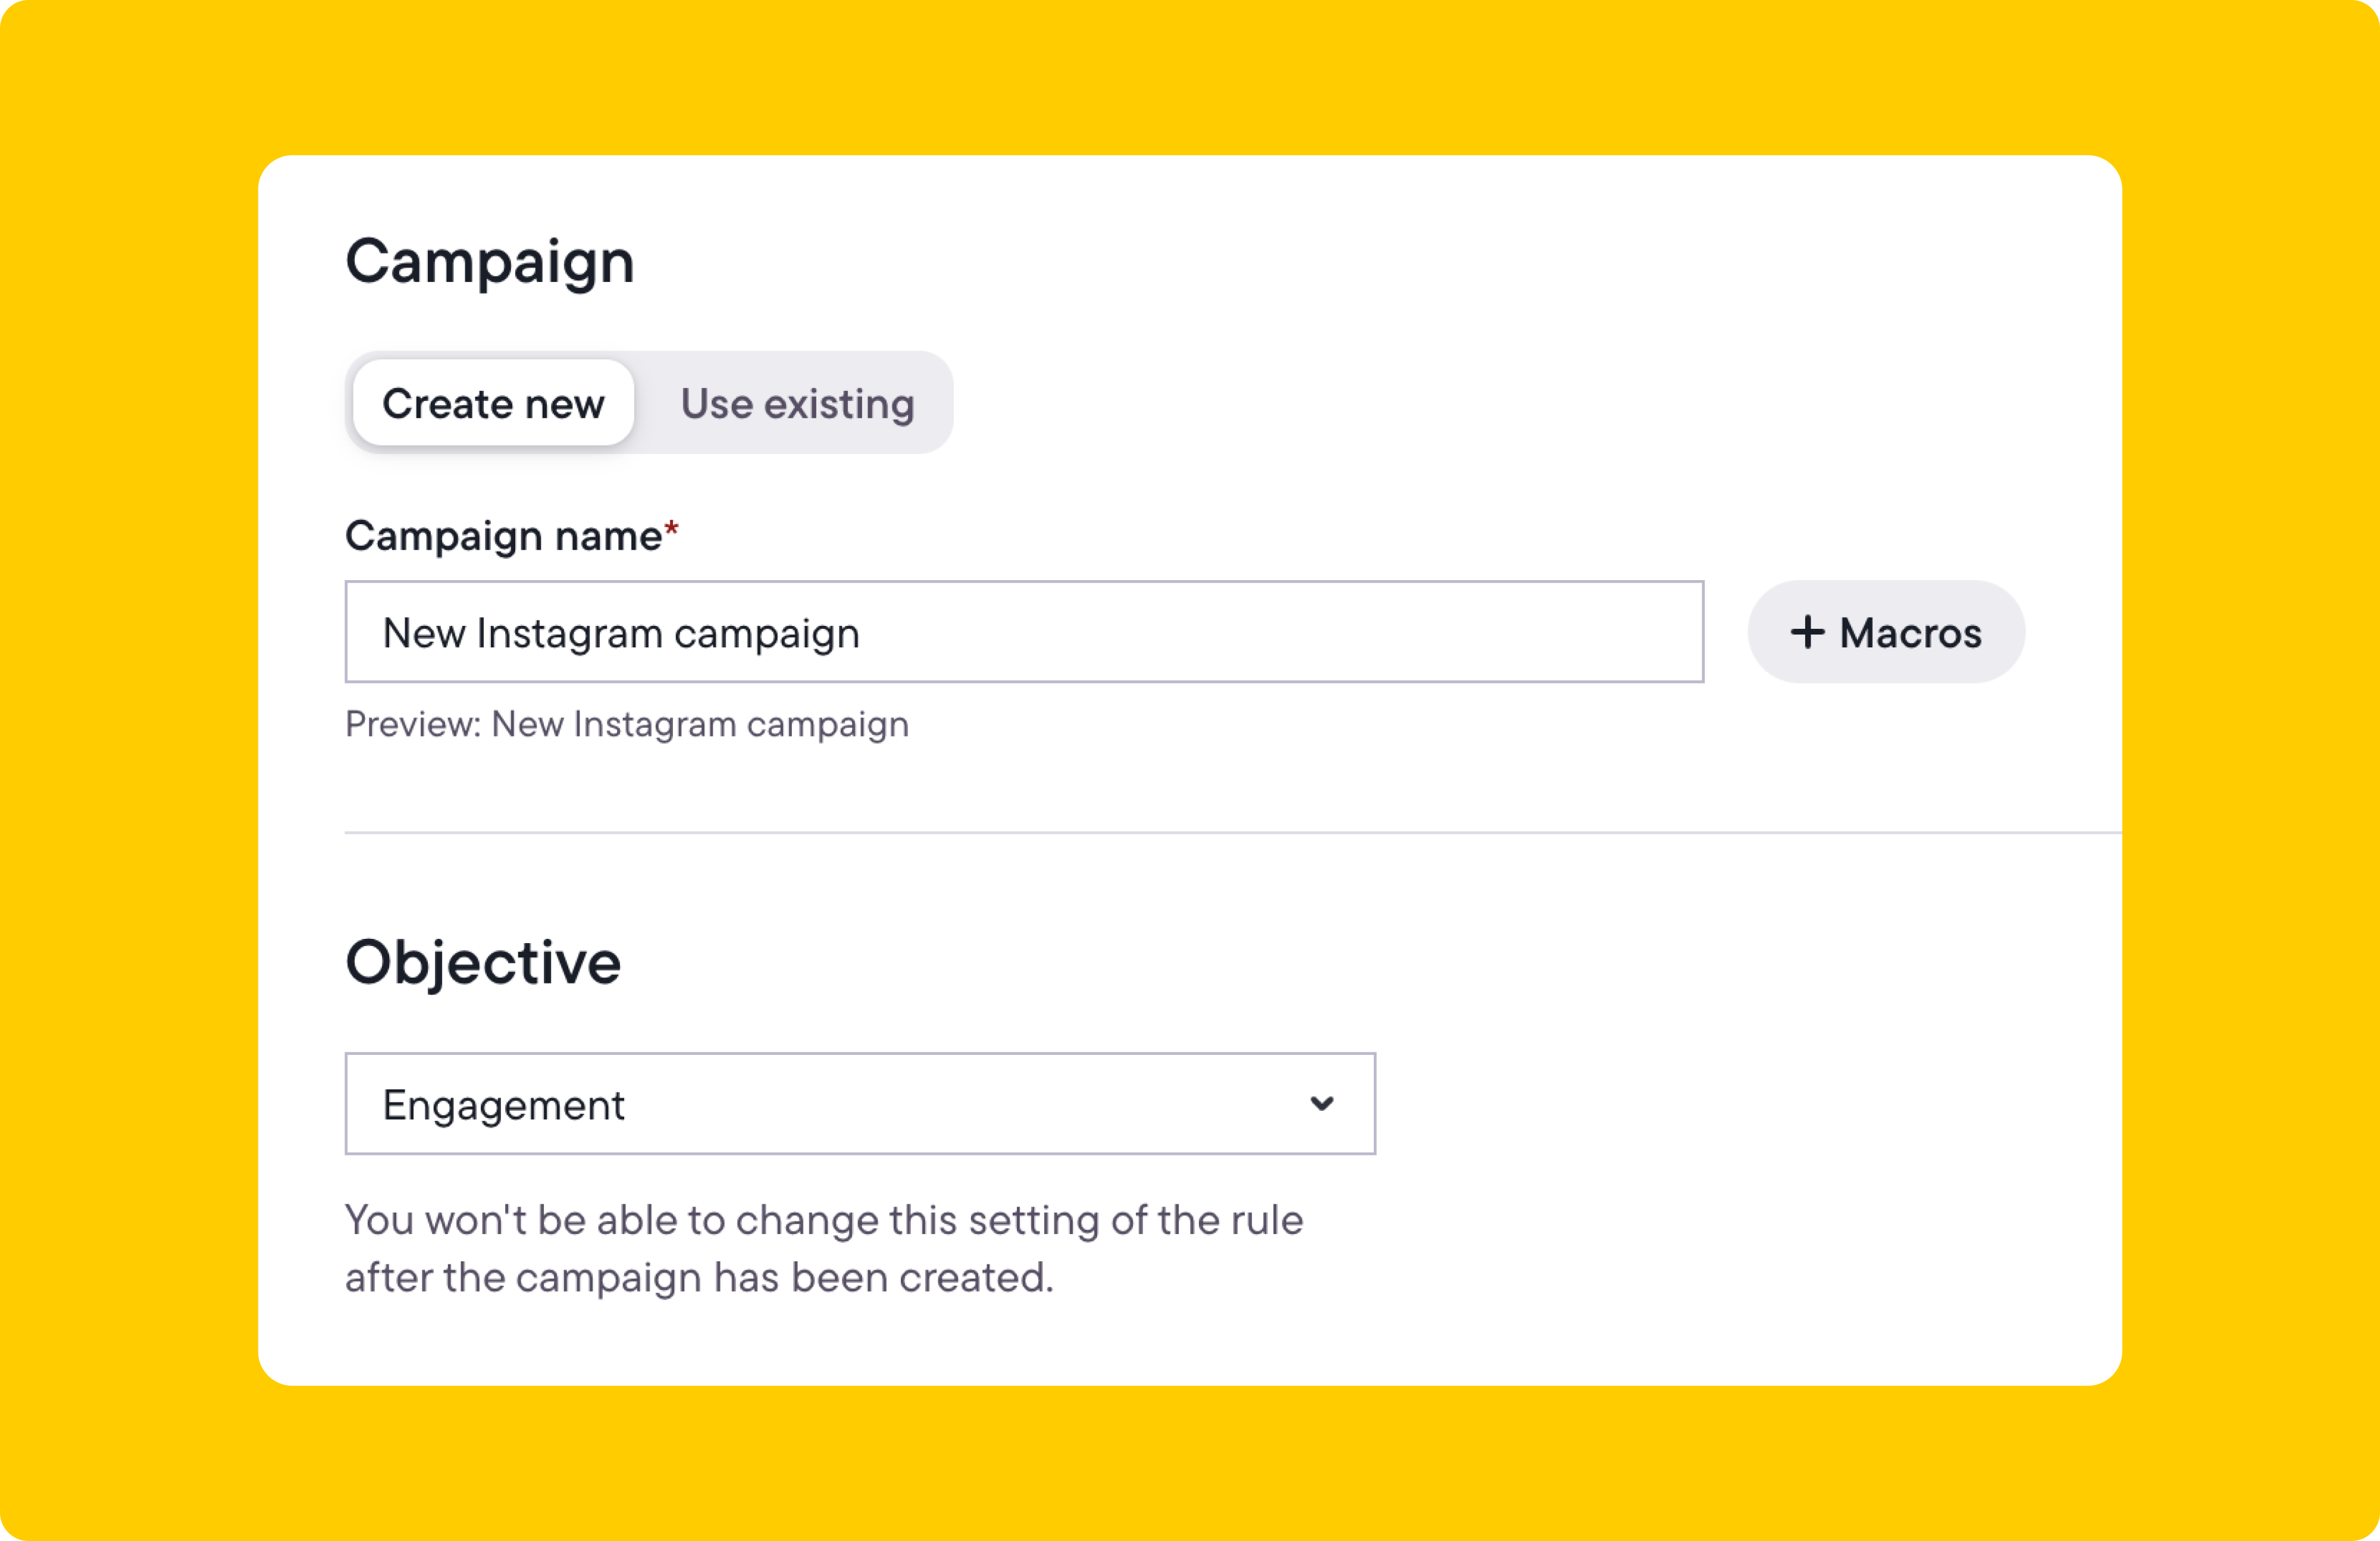
With macros, you can use dynamic text in your campaign name so that each campaign is unique. In the example above, we used the date the campaign was created as part of the name.
Next, set the campaign objective. It makes sense to create multiple post boosting rules here. You can set different campaign objectives depending on the post type or a keyword that’s included in the post text (for example, “sale” or “limited time”). Within this particular campaign, all posts that meet the rules you have set will have the same chosen objective.
In the above example, we opted for the “engagement” objective. You can read more about campaign objectives in Facebook’s Help Center.
Other settings considerations include whether you want to set the budget at the ad set level or use Meta ads campaign budget optimization to set a campaign spending limit.
4. Configure Instagram ad set settings
On the next page, you can set your ad set naming convention, audience, budget, optimization goal, bid strategy, billing event, campaign run time, and placements. Keep your campaign’s initial goal in mind, whether it’s to increase post engagement or generate purchases.
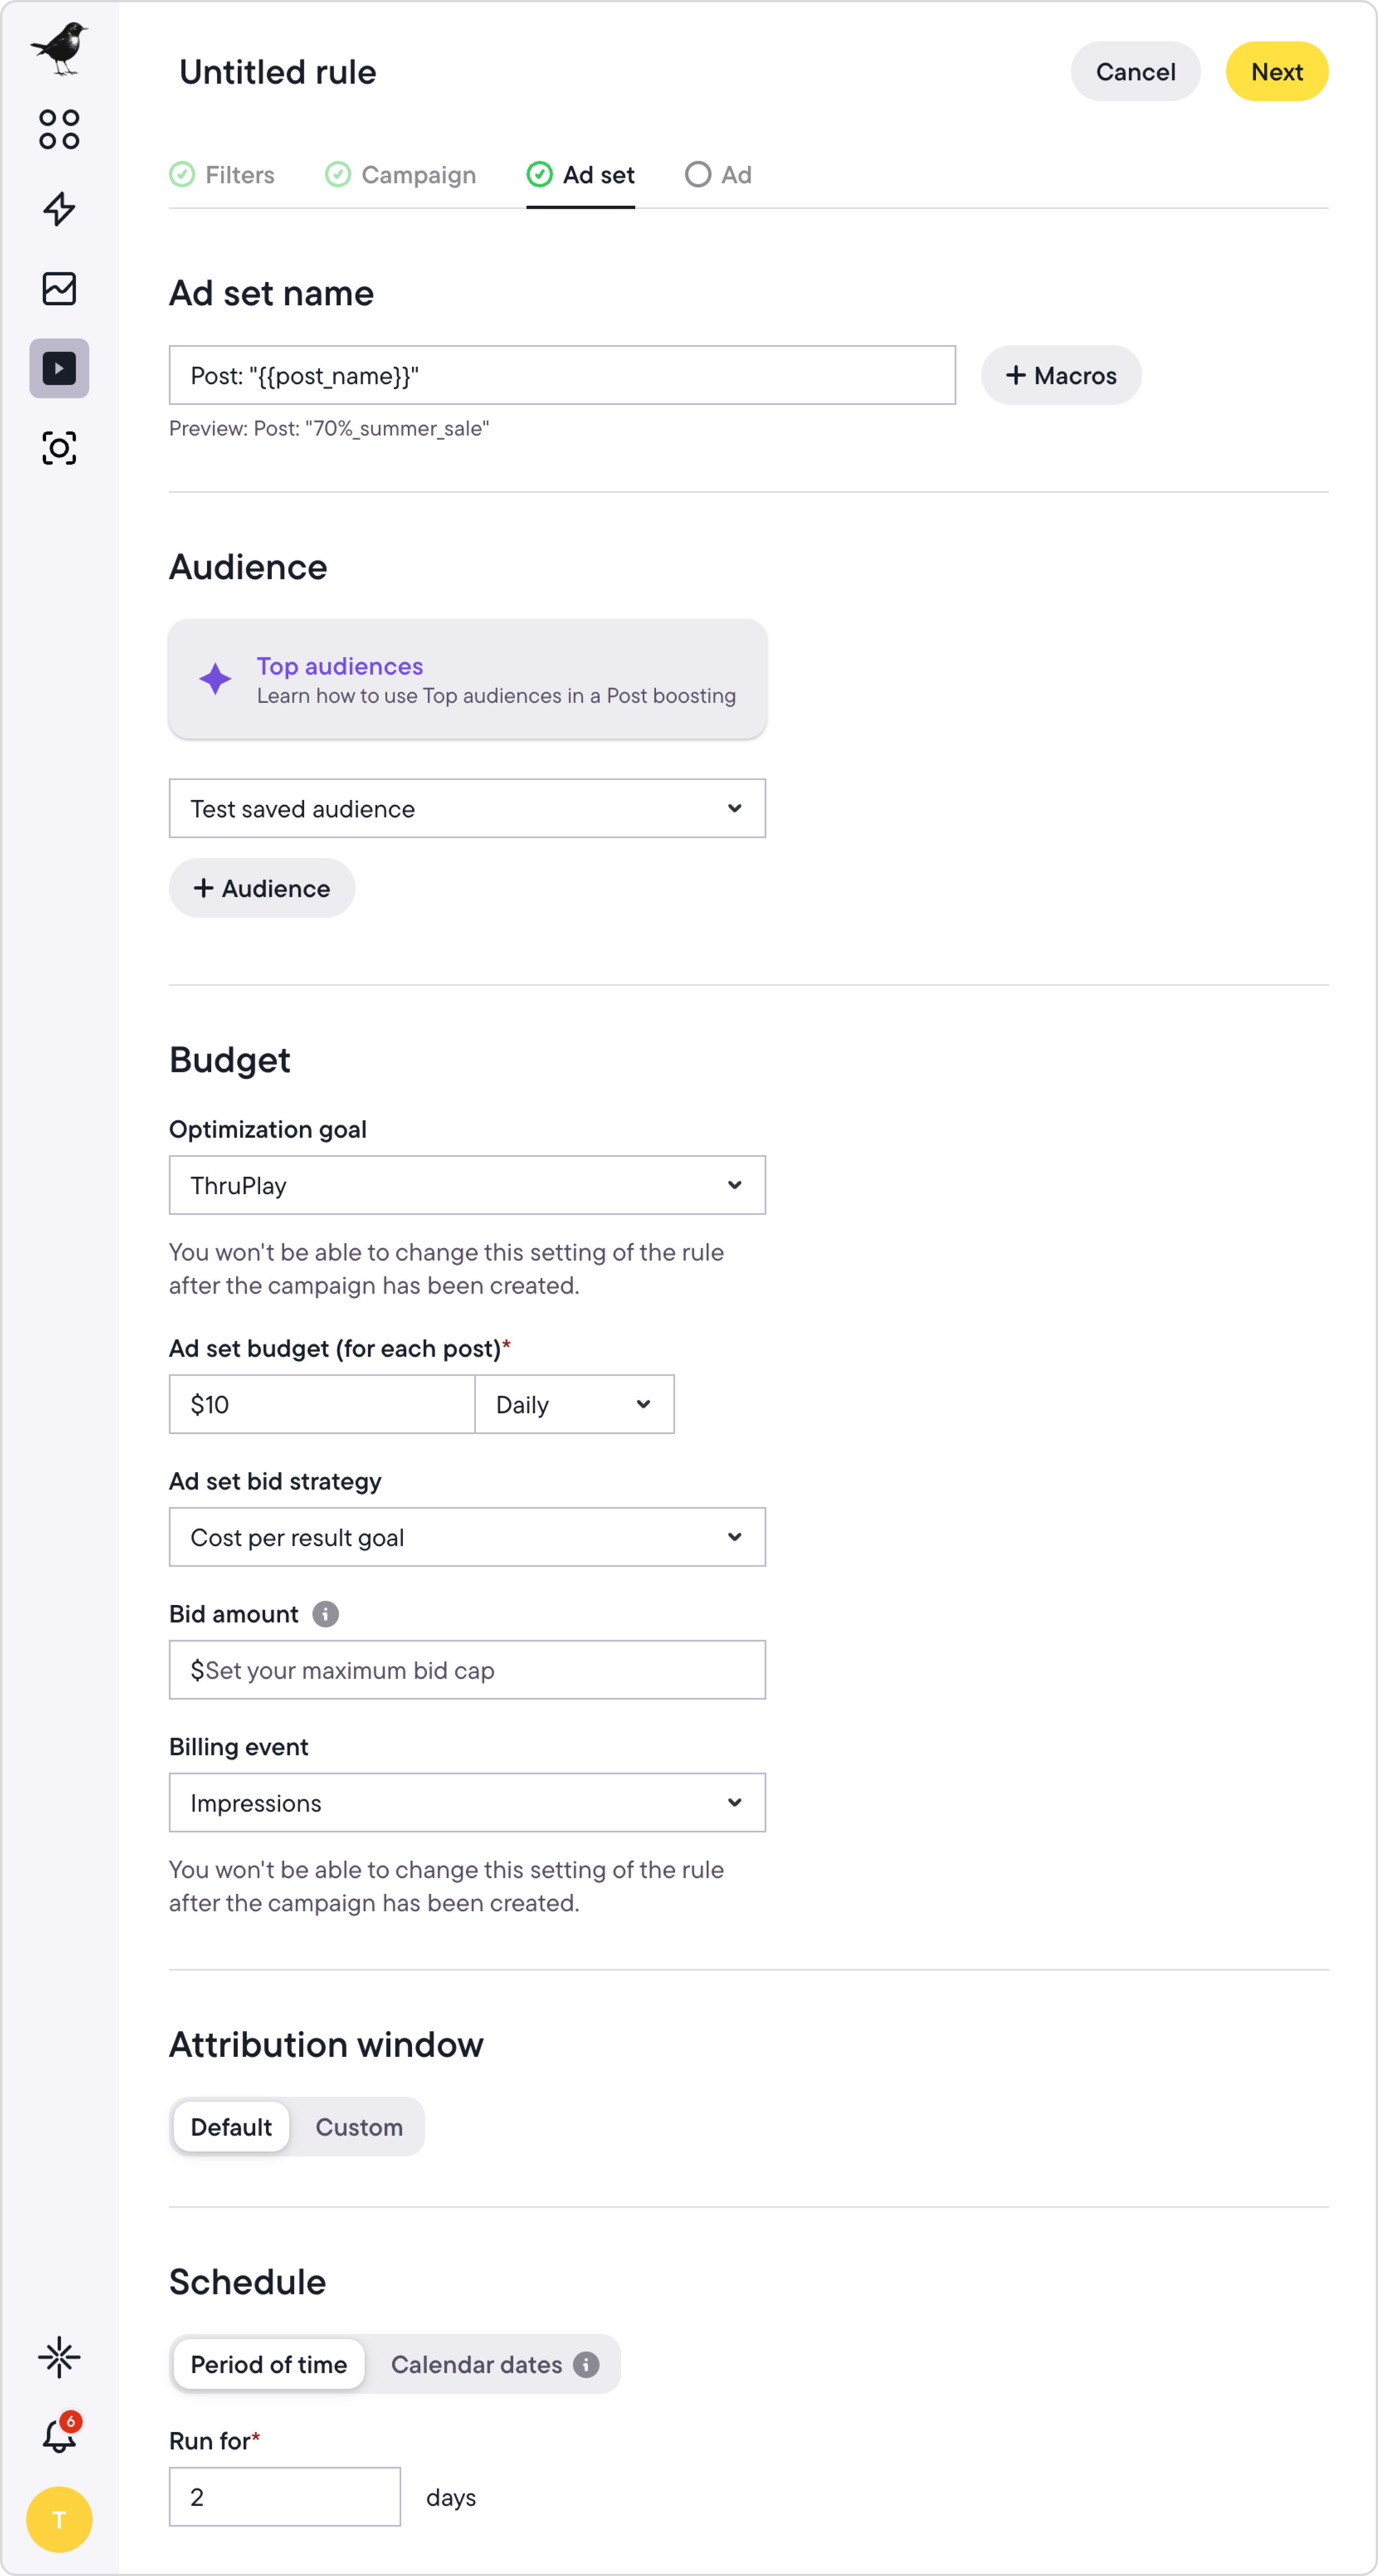
While most of the options here are self-explanatory, the target audience selection is important.
Bïrch allows you to customize the audience your boosted post is shown to. So, if an organic post does well, you’re not limited to boosting it to your page fans or followers alone. You can boost it to a new audience entirely. This is because, behind the scenes, Bïrch is taking your post ID and creating a new ad using that post as the creative—so you can target custom audiences, lookalike audiences, re-targeting audiences, or saved interest audiences.
When scrolling down this page, you’ll see options for placements.
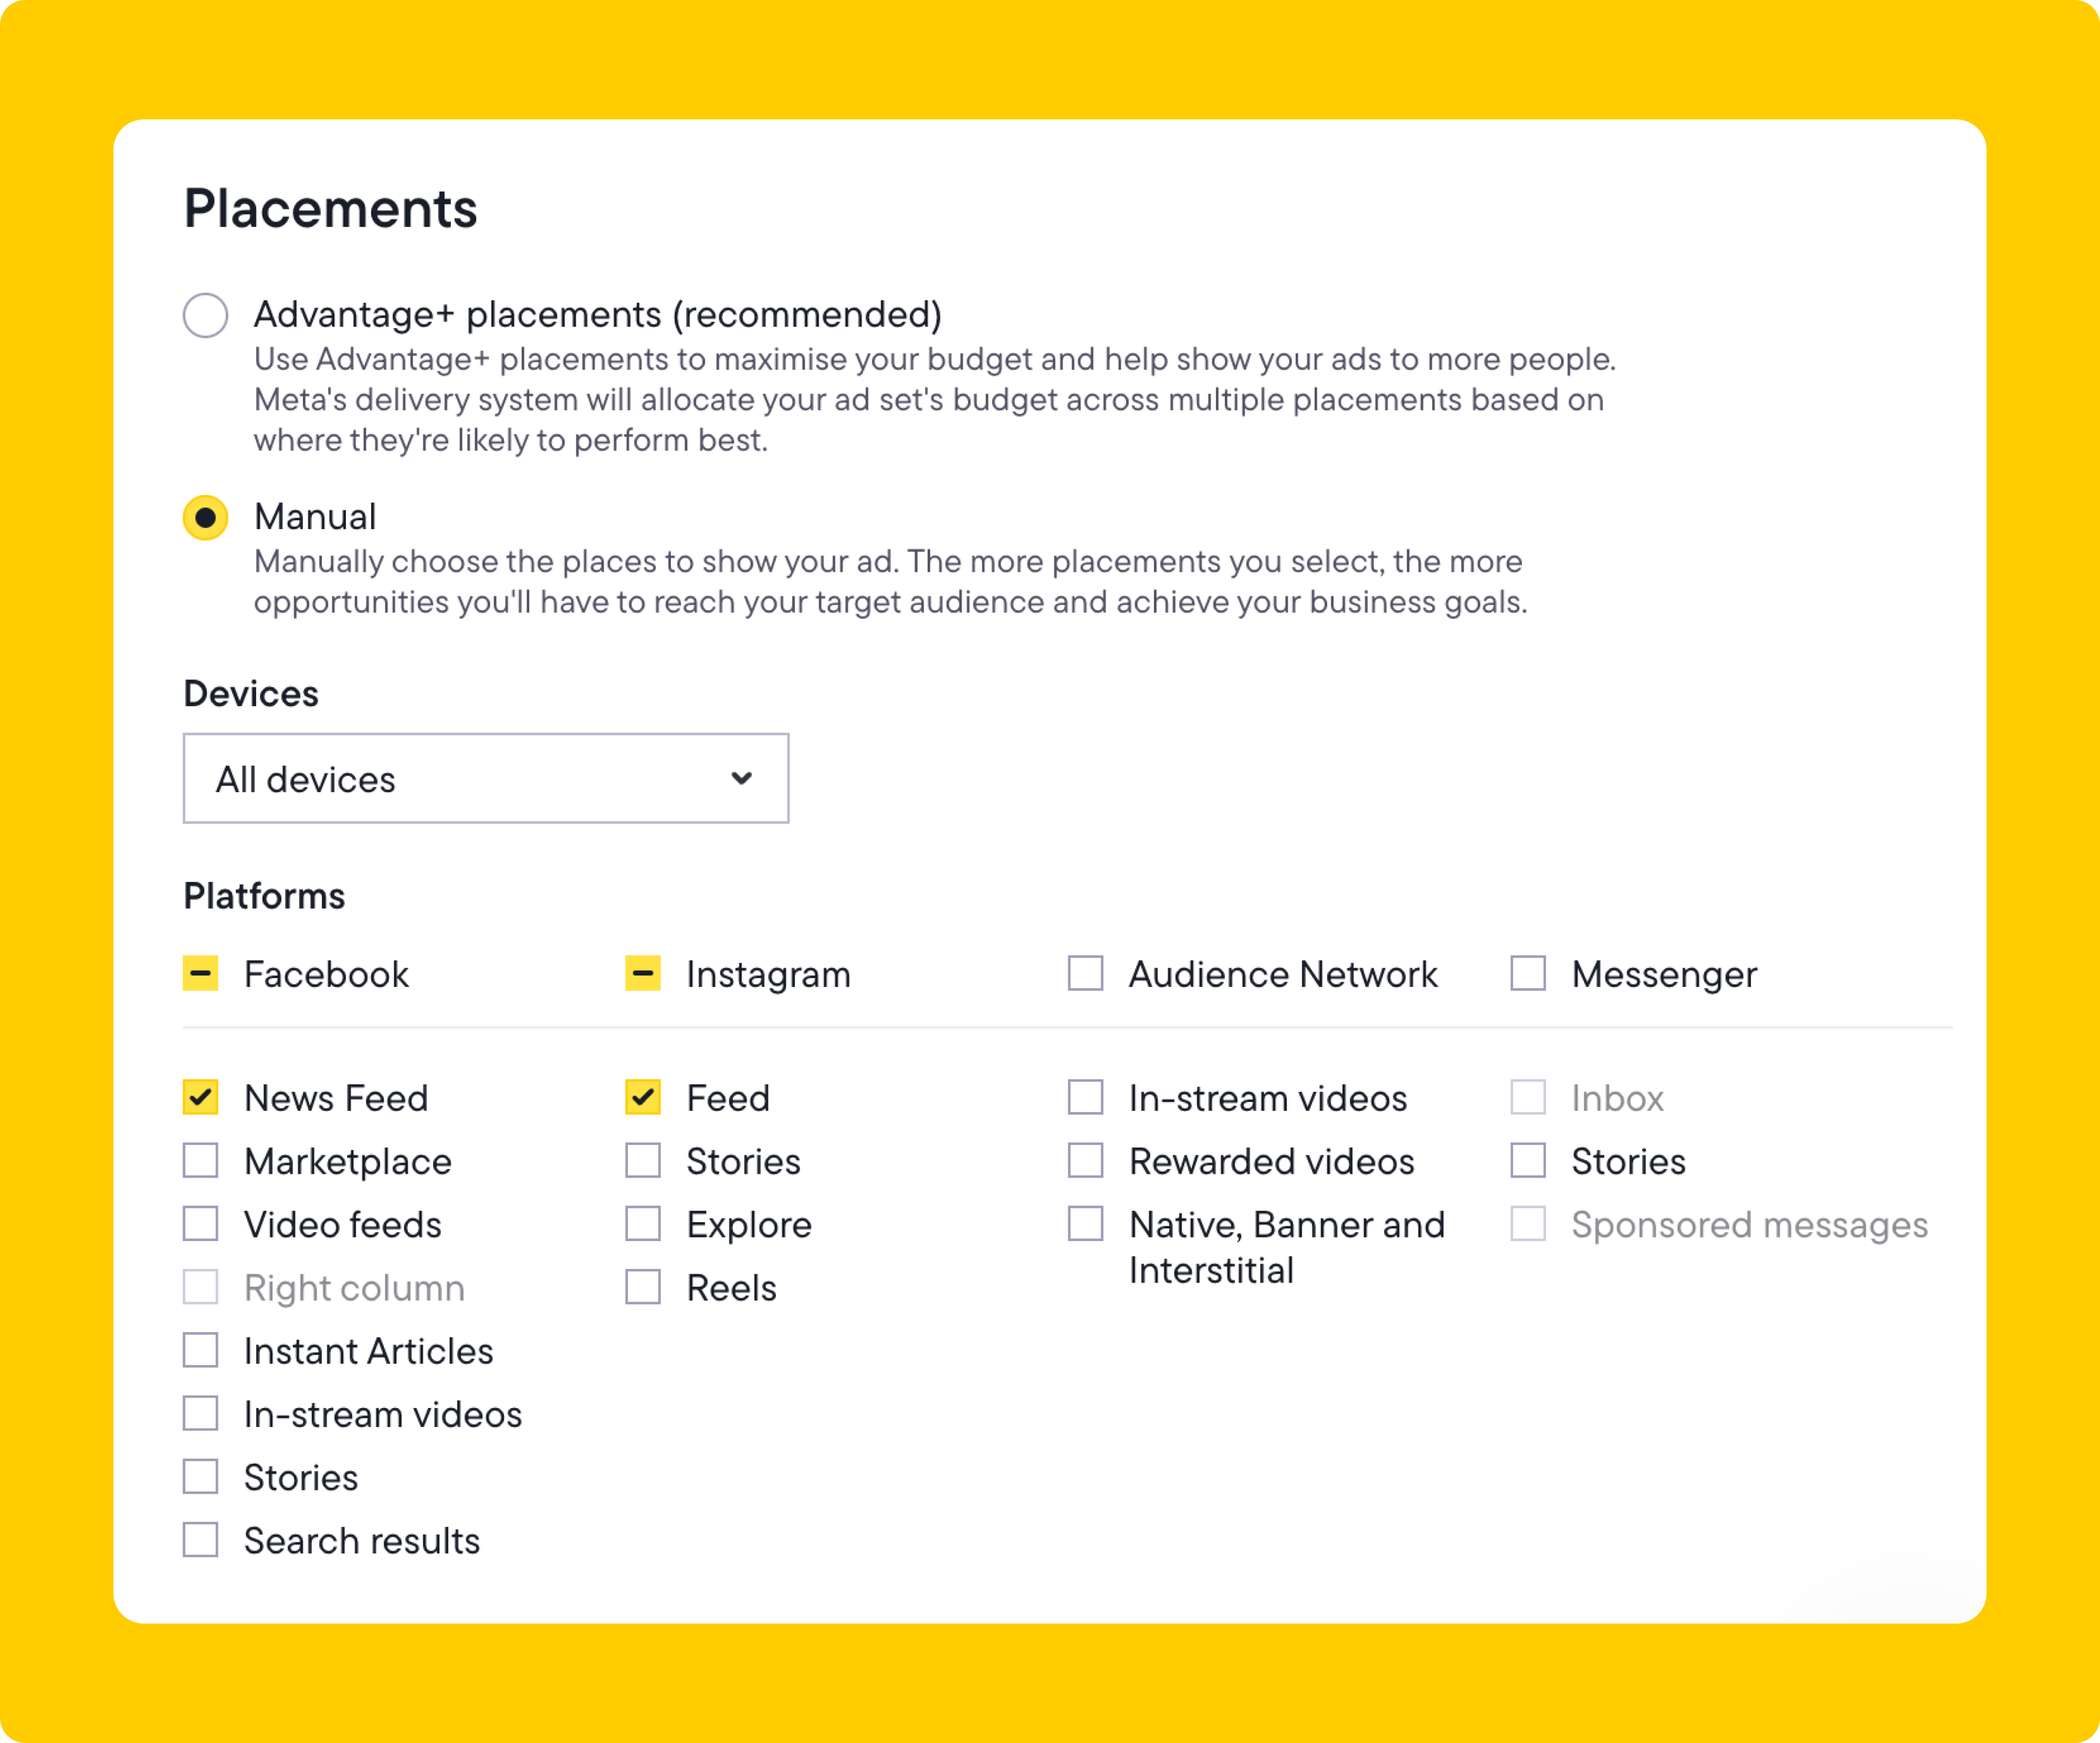
You can choose automatic or custom placements. We recommend choosing custom placements because your post might look out of place when used in some unsuitable placements.
In our example, we boosted Instagram posts to Facebook and Instagram users in the feed only, but you can also select other placements.
5. Configure ad settings
In ad settings, you can add a website link, call-to-action button, or custom URL parameters. You can also set your conversion tracking settings and set up notifications. With macros available to make your URL parameters dynamic, you’ll know exactly from which post traffic and conversions are coming from.
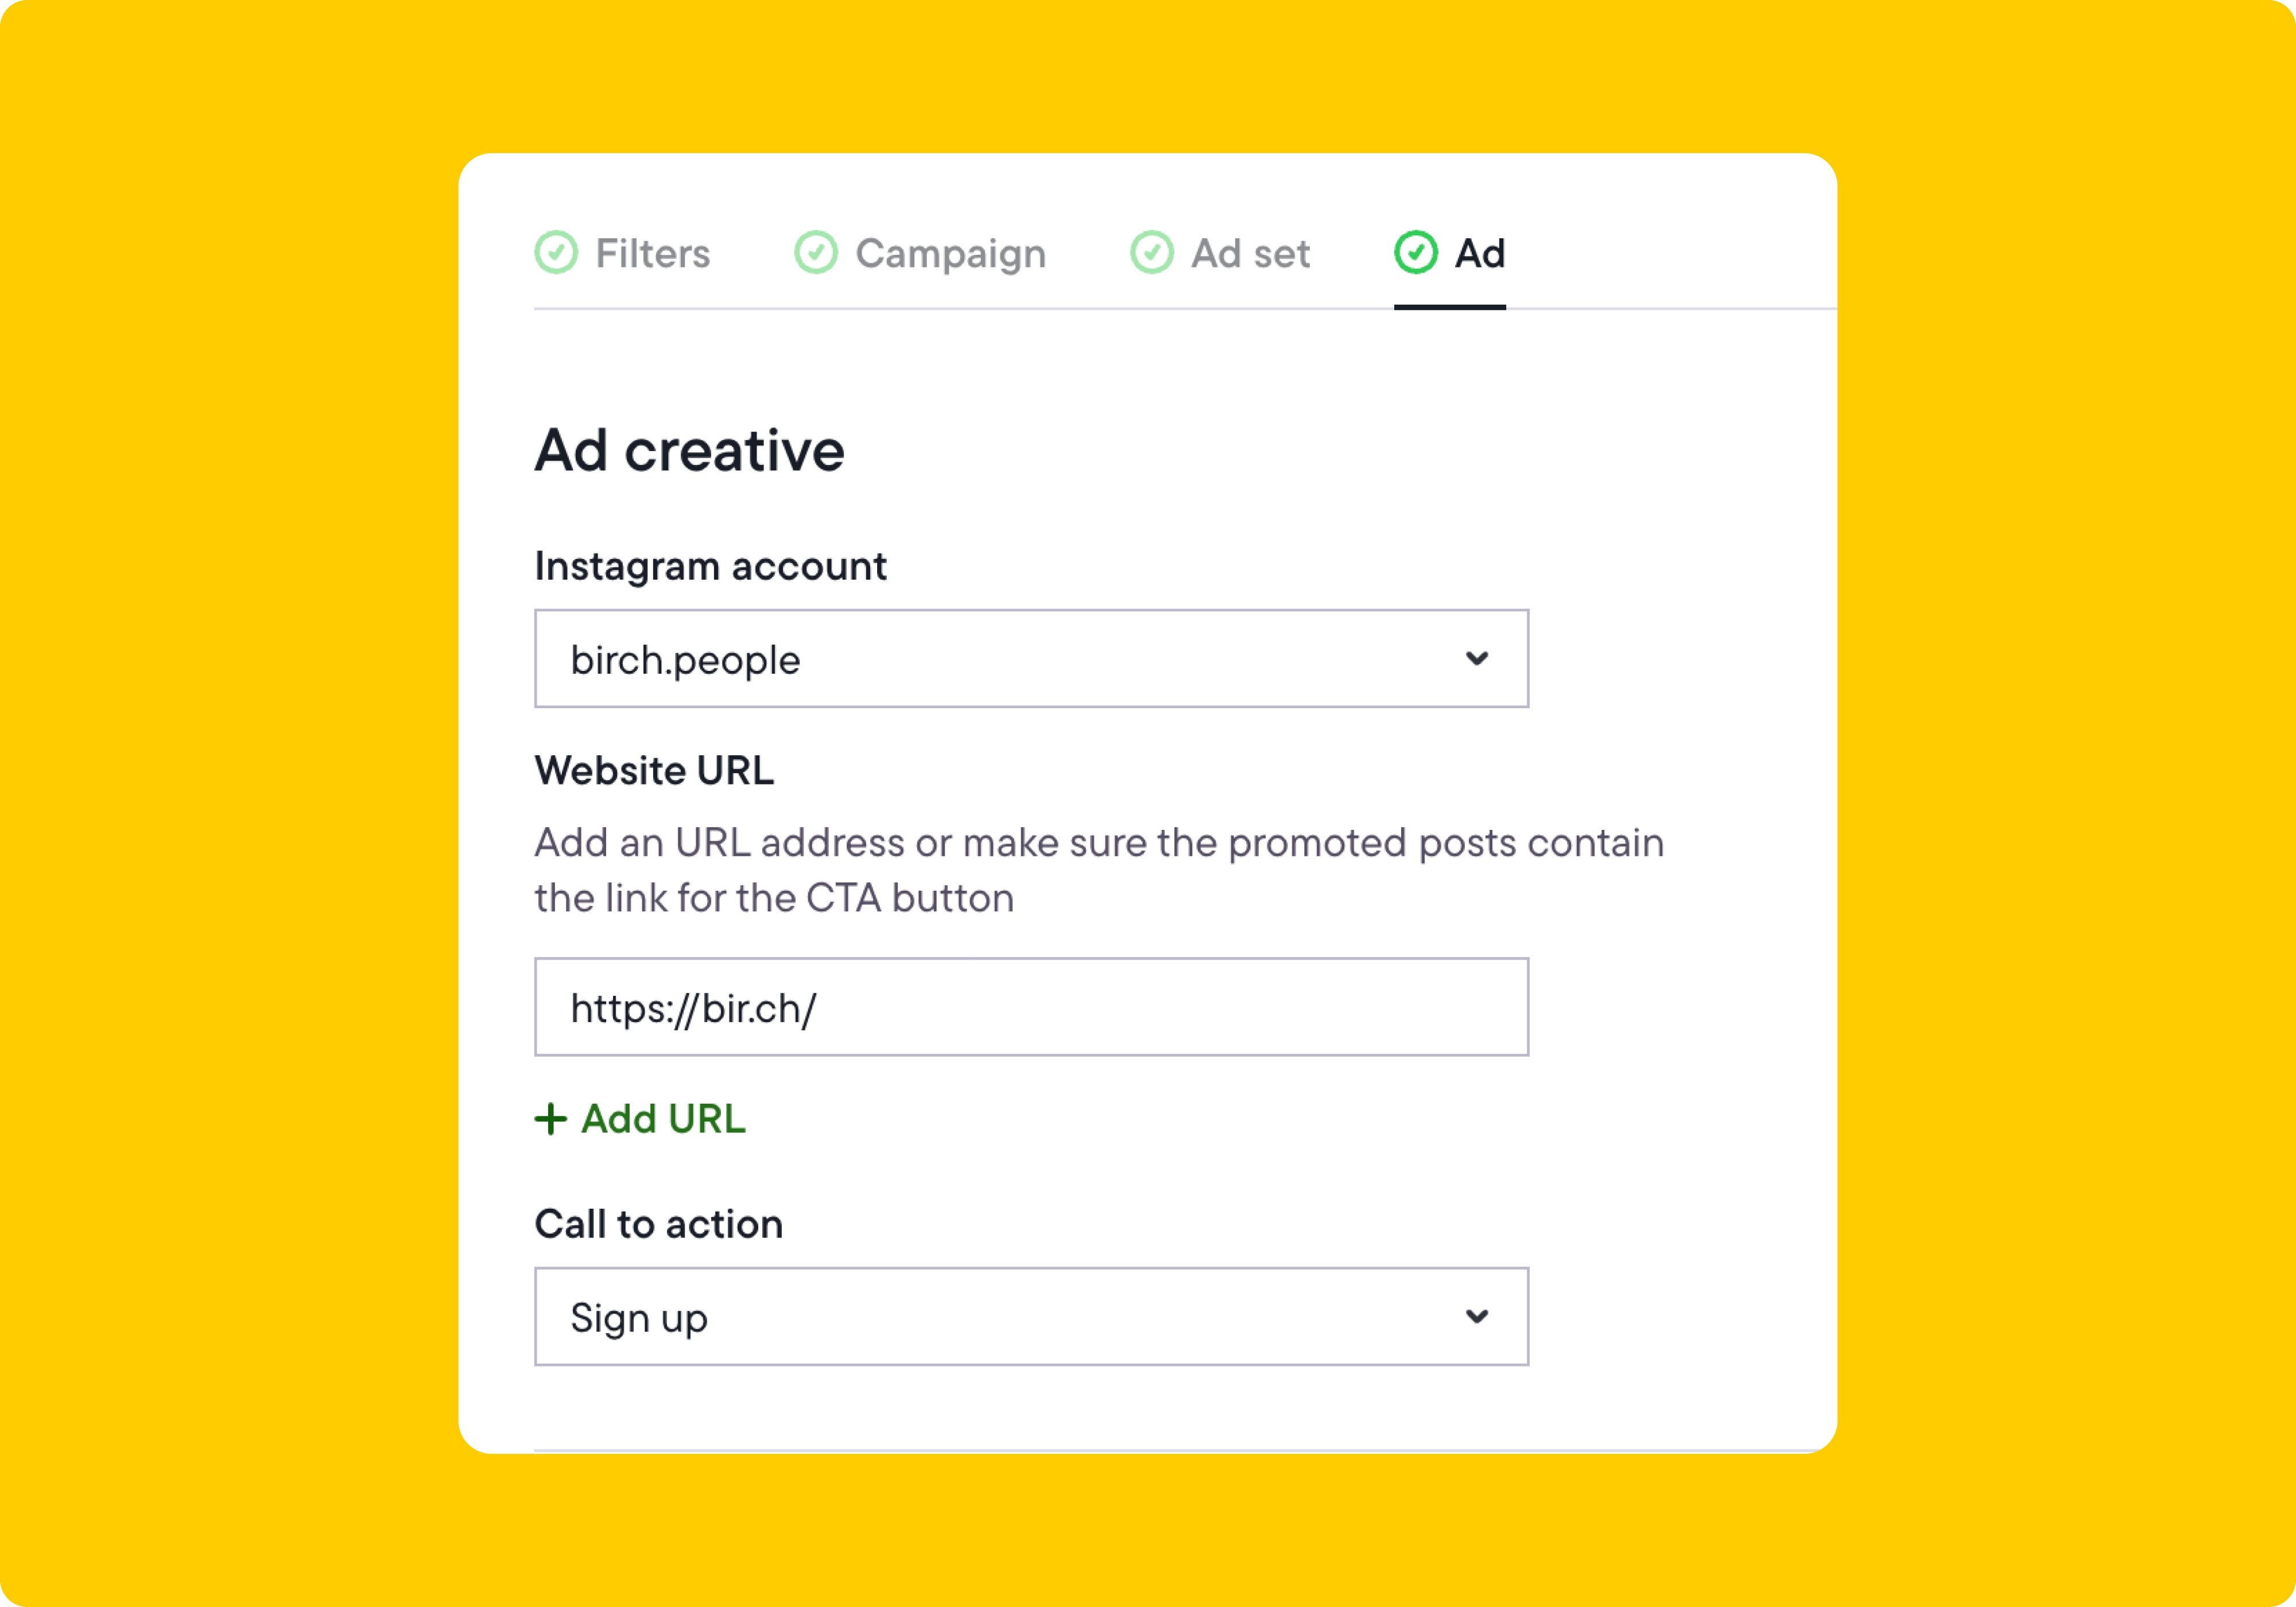
6. Customize the website link and call to action for boosted posts
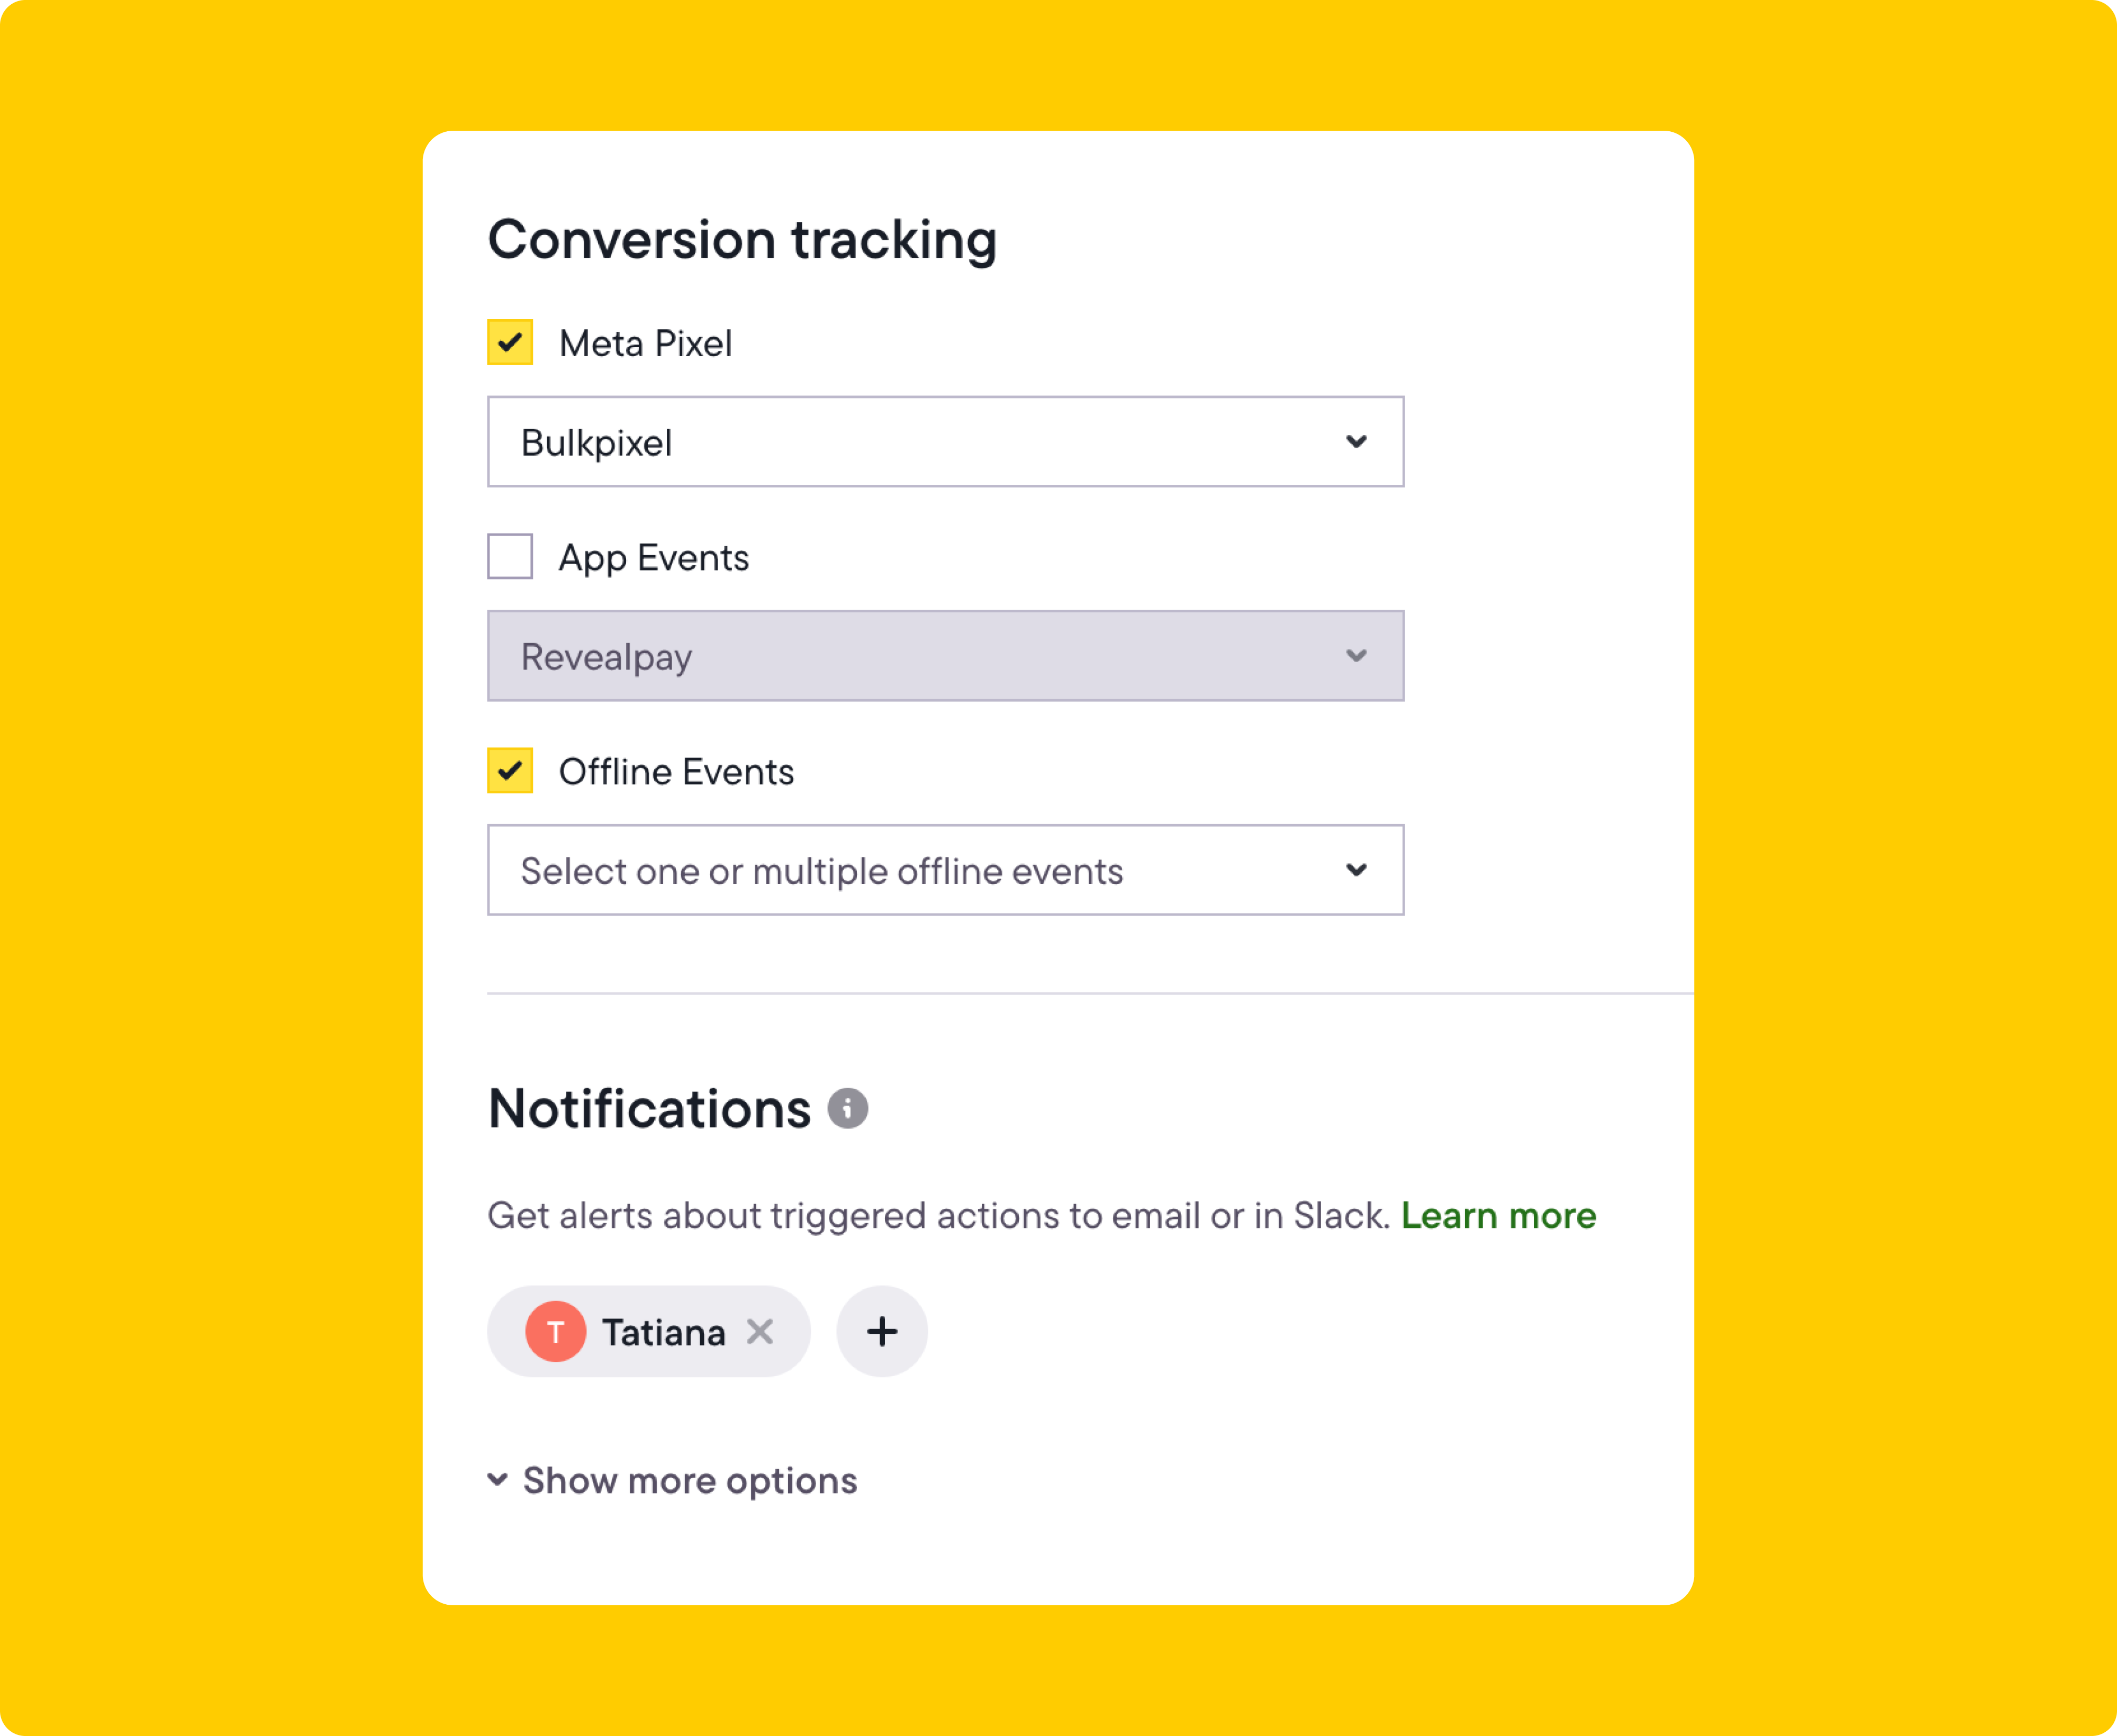
Scrolling down, you can configure your conversion tracking settings and set up notifications. You can be notified via email, Facebook Messenger, or Slack by setting up our Slack integration. In the example below, we set it up so that we receive Slack notifications.
4 ways to boost your best content with Bïrch
Once you’ve set up post boosting in Bïrch, the next step is deciding what to boost—and when. Instead of guessing, you can create custom rules that automatically promote the content your audience is already engaging with.
Below are four practical ways to boost your best-performing posts, Reels, and Stories using Bïrch.
1. Turn your best-performing posts into ads
If a post is already getting strong engagement, that’s a clear sign it’s resonating. Instead of letting it fade in the feed, you can turn that post into an ad automatically so that it keeps working for you and reaches more of the right people.
The following example demonstrates boosting a post that includes the word “shop” and has at least 10 comments.
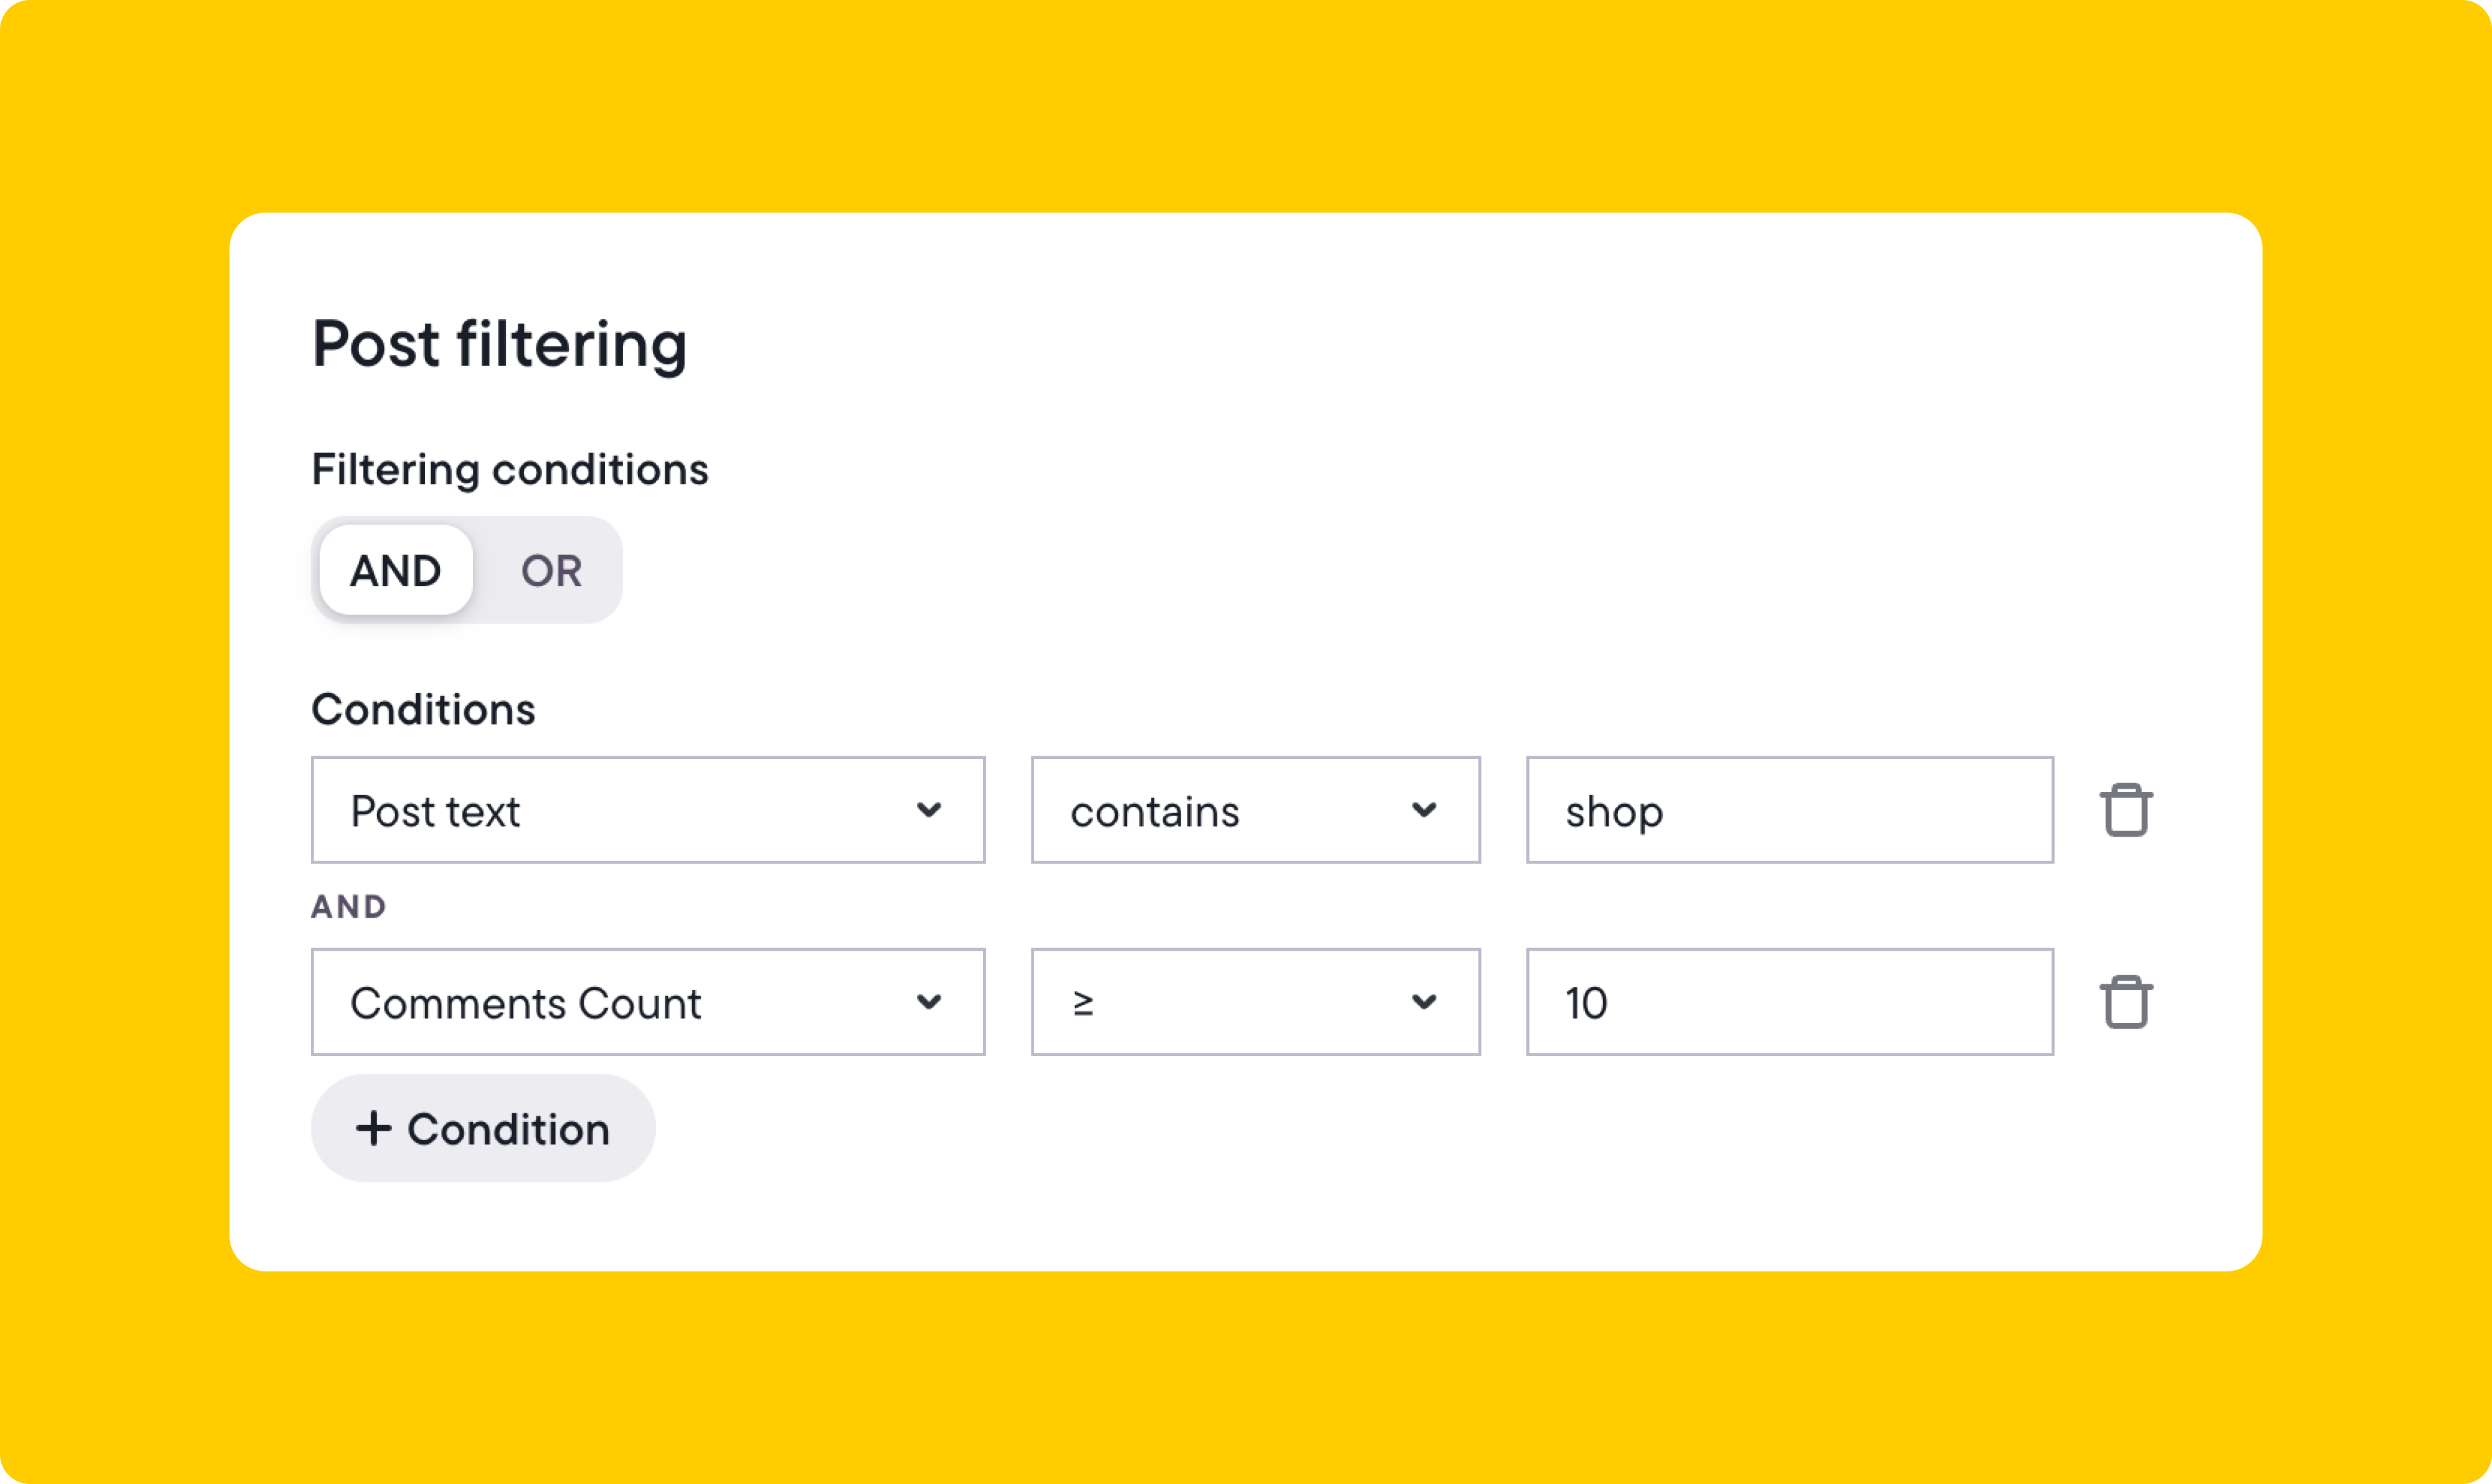
Once the filtering is set, you can customize the ad settings, add a website link, and use the “shop now” call to action.
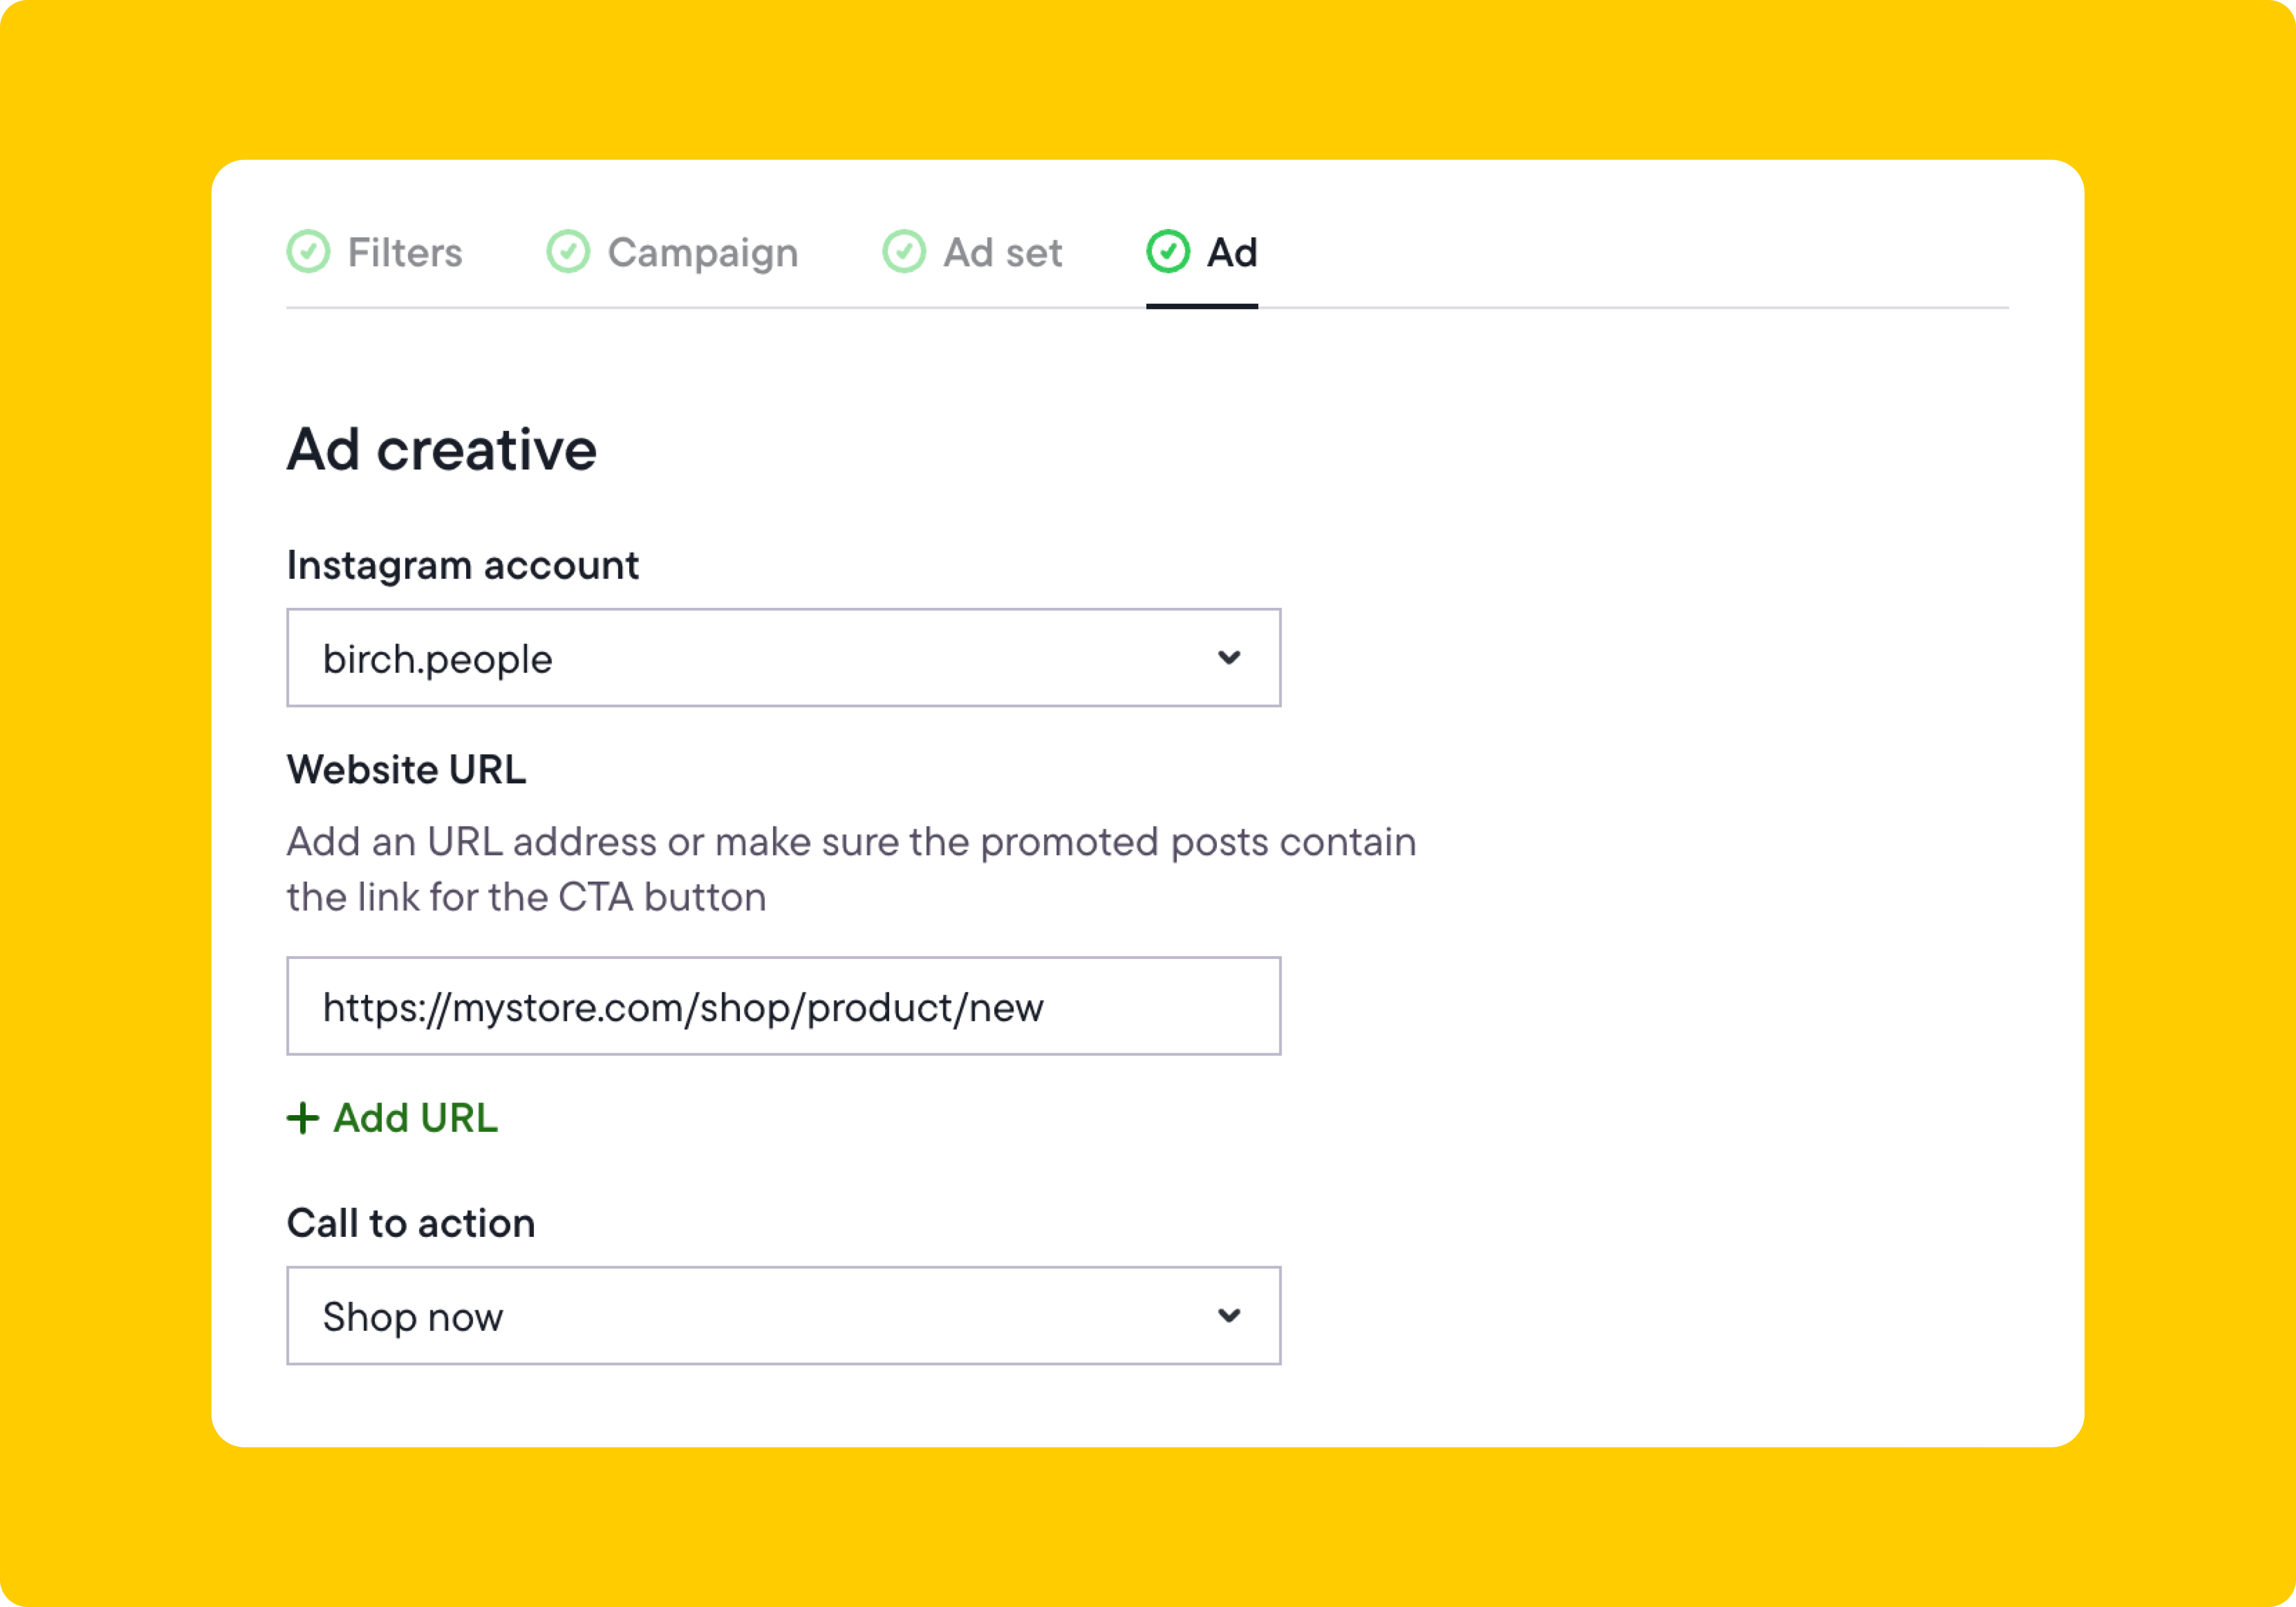
With this setup, you’re automatically turning your best Instagram posts about your products into conversion ads while keeping that organic engagement on the post. Of course, you would be able to set the audience and placements in this automation to target our middle- and bottom-of-funnel audiences as well.
2. Auto-boost posts with lots of likes
You’ll probably be more inclined to spend money on content that has a proven track record in terms of organic reach. That’s why auto-boosting posts with lots of likes is the most popular way to boost content on Instagram.
To auto-boost a post like this, first, analyze your average engagement rate (likes, swipe-ups, comments) and the average time it takes for your content to gain this engagement.
Using that data, you can specify the number of likes a post needs before it’s boosted.
Let’s say around 900 people on average like your posts and it takes about two days to get all those likes. In that case, you might decide to boost an image, video, or carousel post that gets 1,000+ likes within 48 hours. The formula would look like this:
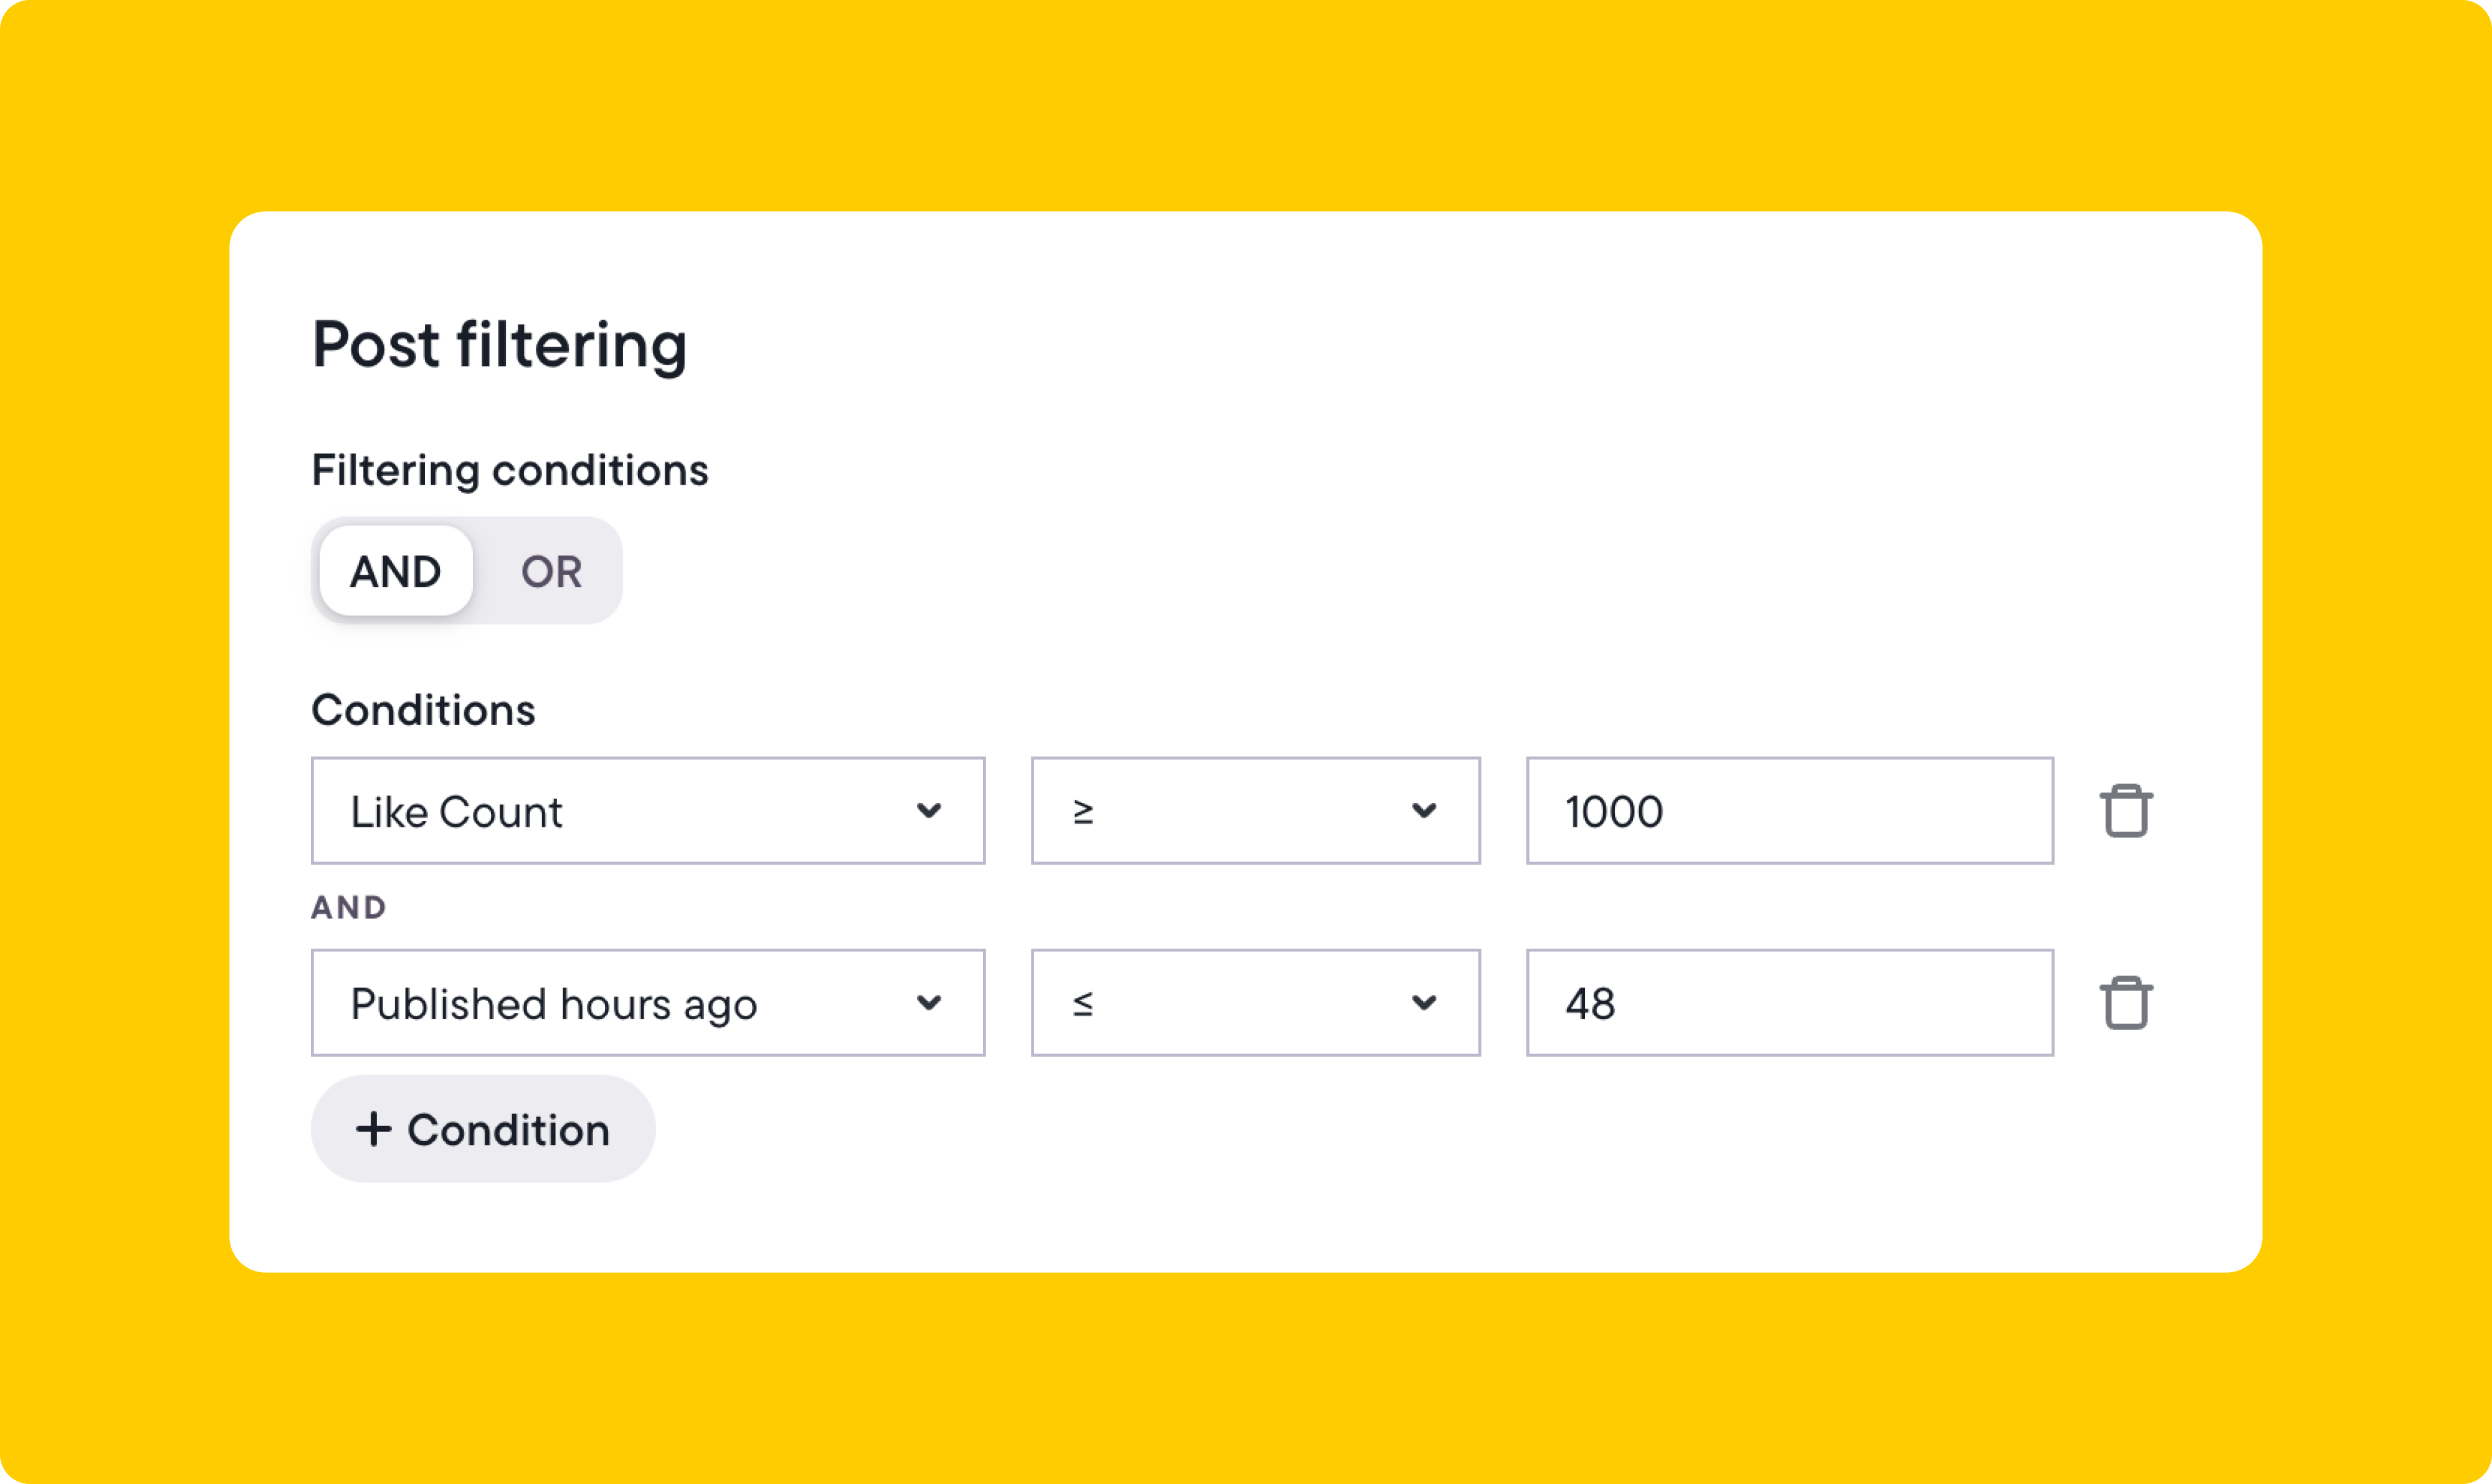
The audience-targeting and placement will depend on your business and each post’s goals.
3. Auto-boost posts with video that gain lots of views
Boosting videos is as easy as promoting posts, but it involves following a slightly different set of rules. Instagram auto-plays videos and shows a view count by default rather than a like count, so the view count actually tells you people are watching your content.
Let’s say your average video view count is around 3,500 views. You might create an auto-boosting rule like this:
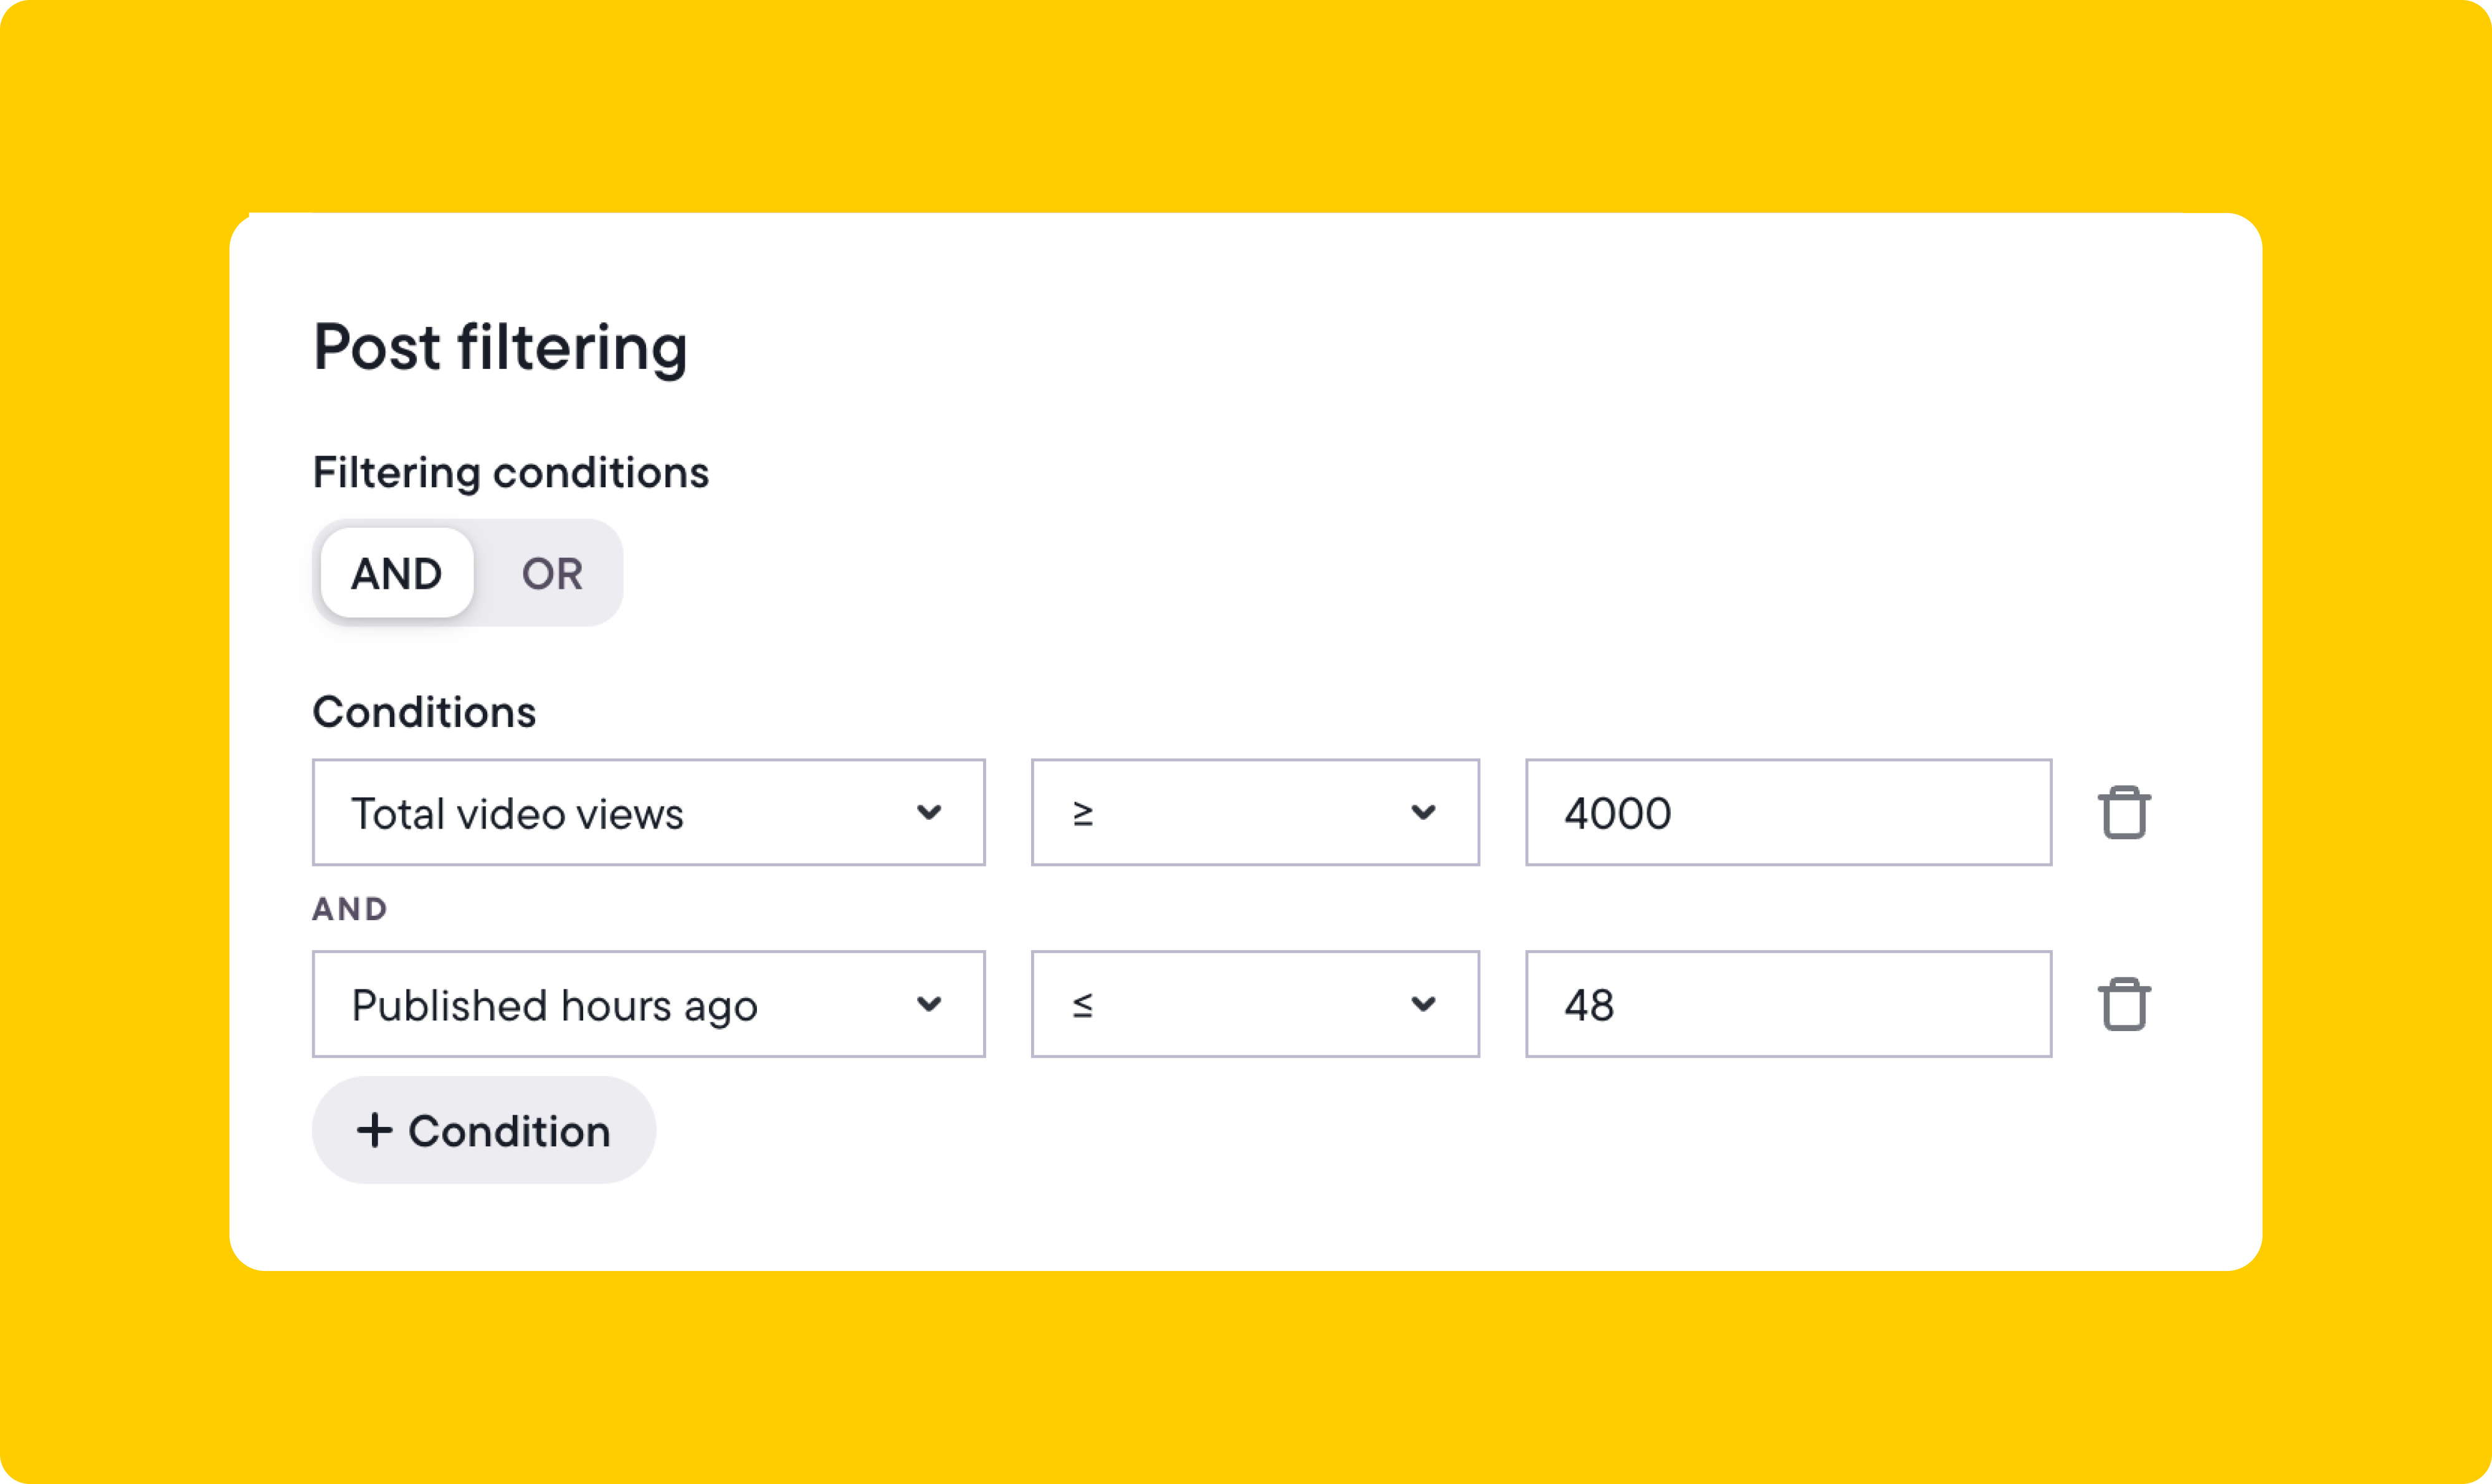
You can also combine a like count and video view count if you wish.
4. Auto-boost Instagram Stories with lots of views
Instagram Stories can include Reels, images, polls, and links, which makes them perfect for re-engaging users and driving traffic to your website and app.
Let’s say you want to boost an Instagram Story that’s a video and has above-average views. Here’s how you can automate that:
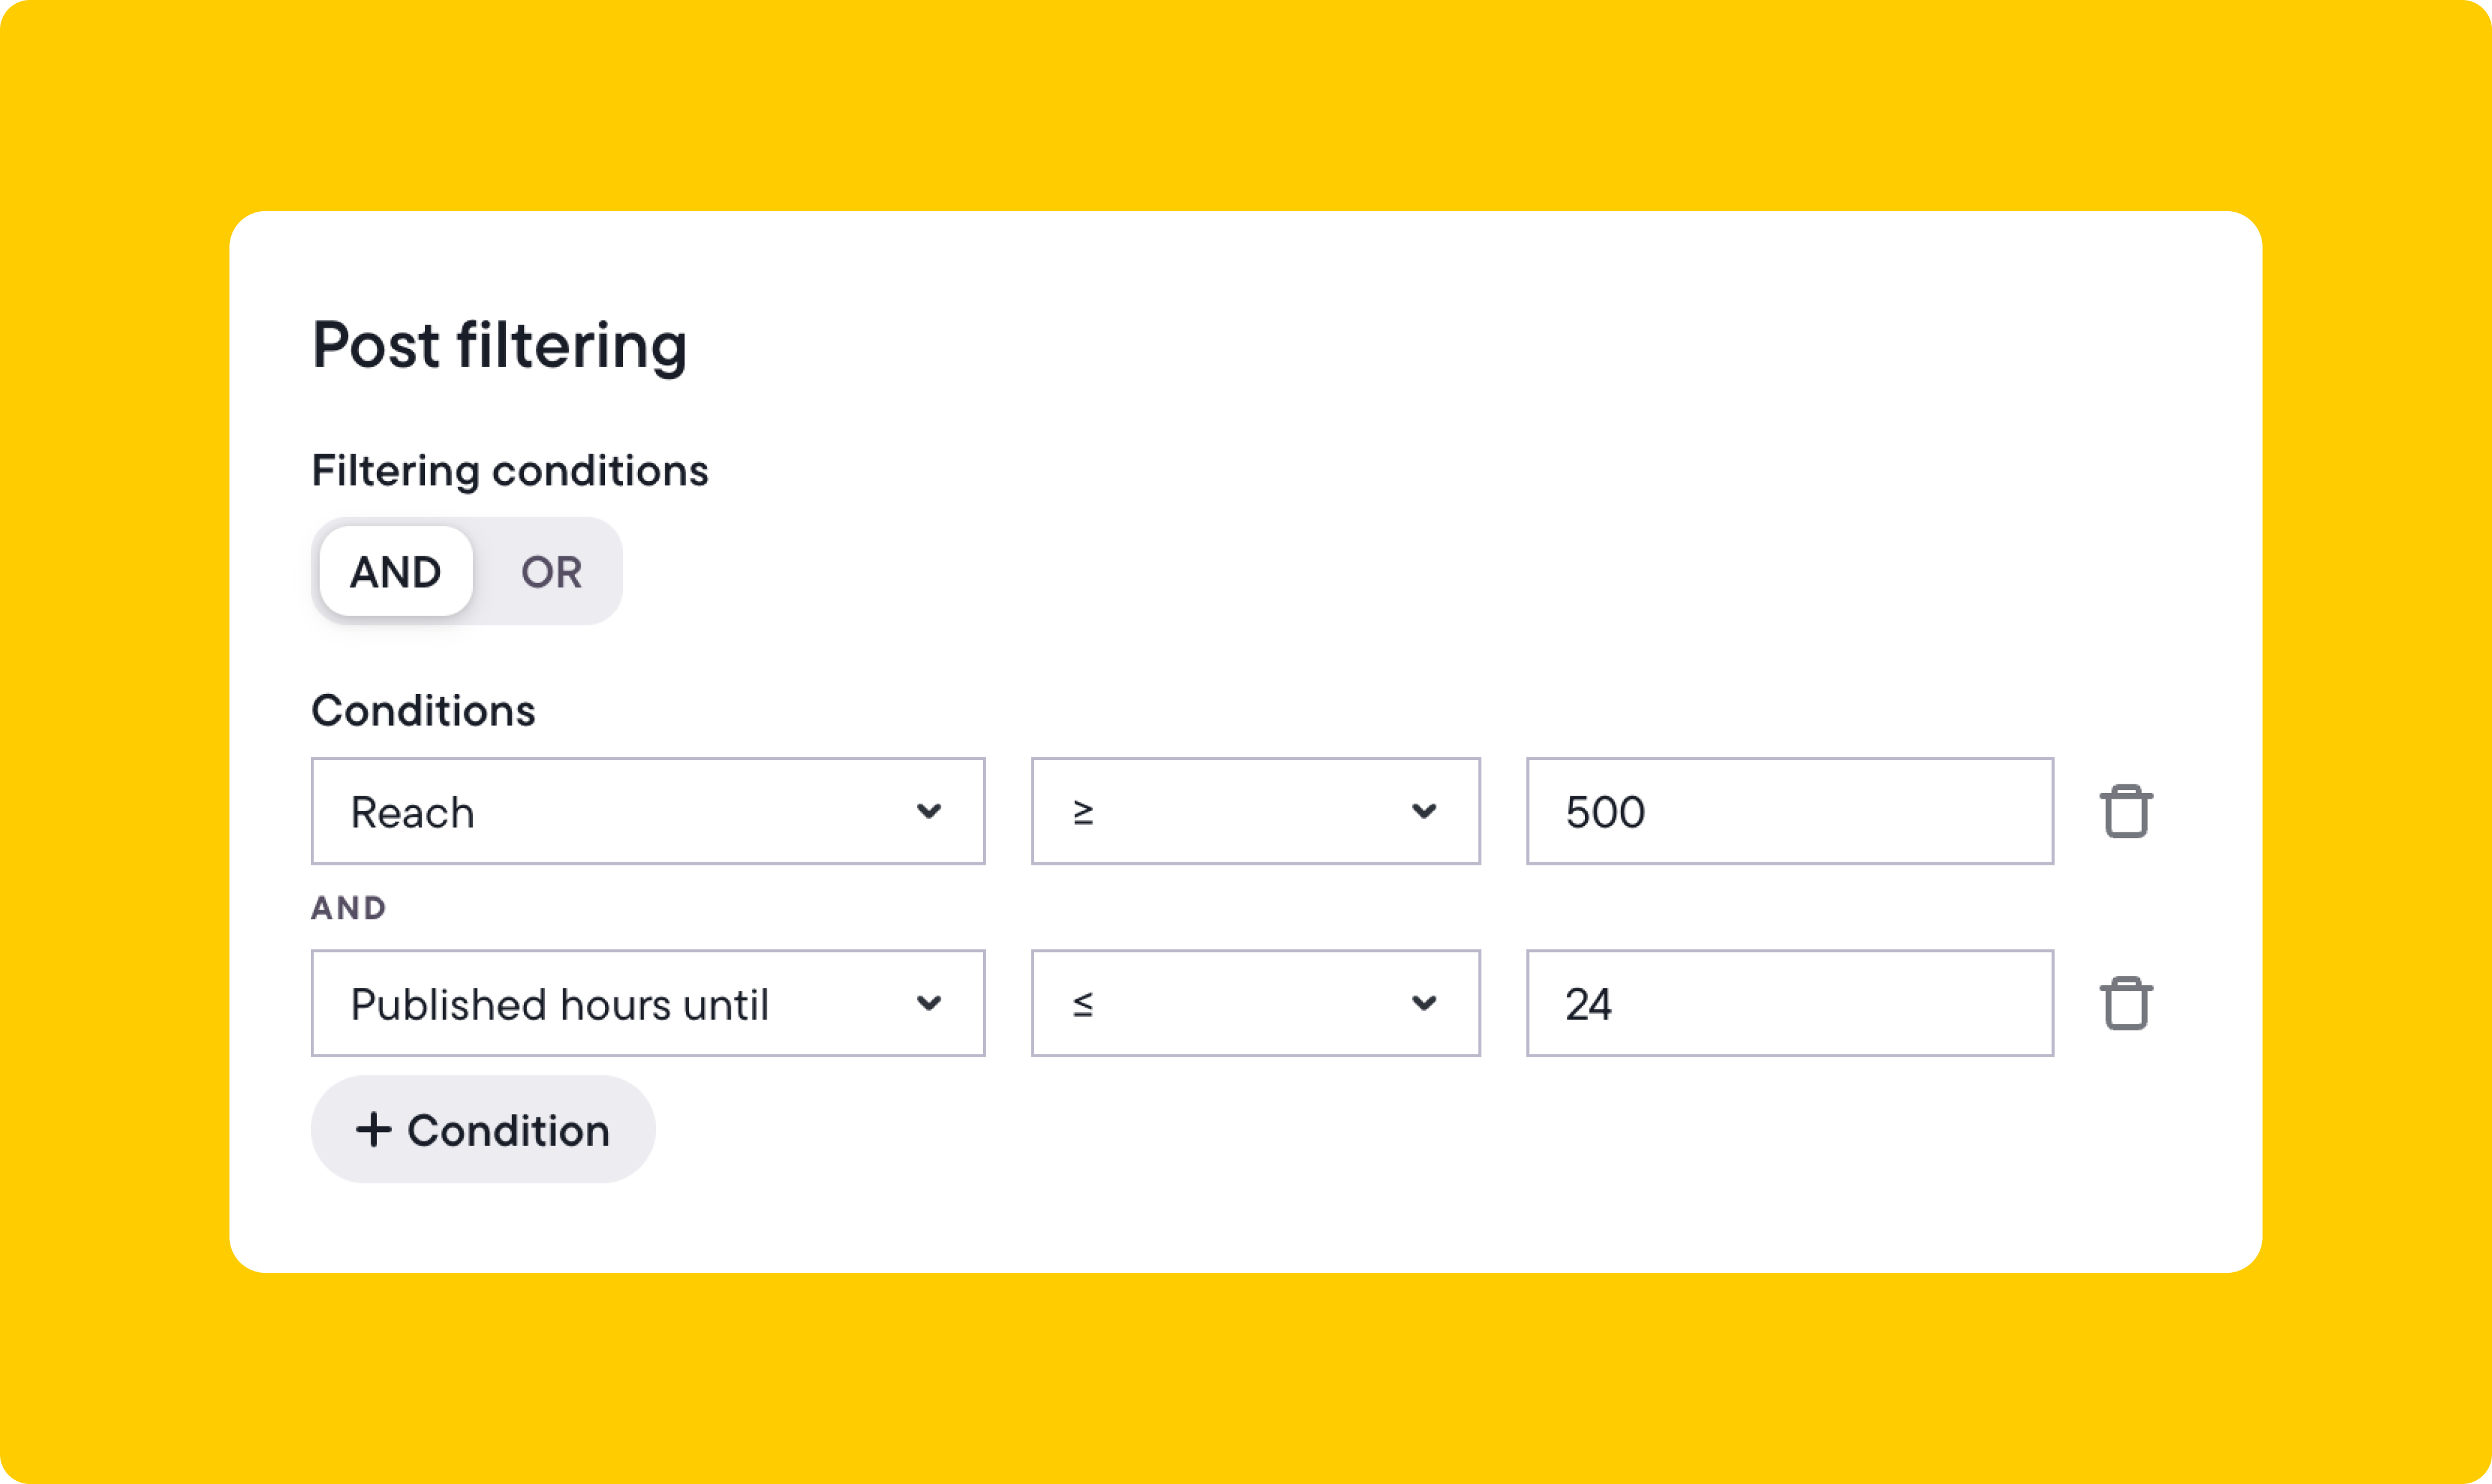
A time length restriction is added in the example. That’s because you can save Stories to your profile, and you probably won’t want to include them if they are old.
Tips to improve reach and engagement
These Instagram boosting tips can help drive better results and make sure you’re allocating budget to posts that are actually worth promoting.
- Target people who have already interacted with you. Choose audiences like past website visitors, Instagram engagers, or customer lists to boost content to people more likely to convert.
- Match your campaign goal to what you want people to do. If you’re promoting a product, choose Conversions. For blog posts or landing pages, choose Traffic. For likes or comments, choose Engagement.
- Use placements where your post looks best. Stick to Feed and Stories if your content is designed for mobile. Skip placements like Audience Network where formatting might break.
- Boost posts early, within 24 hours of publishing. This gives your content a better chance to perform while it’s still getting organic reach.
- Create different rules for different post types. Separate videos from carousels and Stories so you can choose the right goal, audience, and budget for each.
- Set a minimum engagement threshold before boosting. For example, you might only boost a post if it gets at least 500 likes or 10 comments within the first day.
- It’s best not to boost posts that aren’t clear or visually clean—for example, those with long captions, low-quality images, or messages that are hard to understand at a glance.
- Start with a small budget and increase spend on content that performs. Avoid putting your full budget behind every post. Scale what’s working.
- Boosting posts just to try and save them is unlikely to work. Use post boosting to amplify content that already shows signs of working well.
Make your best posts work harder
Boosting posts is one of the easiest ways to get more out of the content you’ve already created, especially when you adopt a strategic approach.
With Bïrch, you can automate your post boosting based on real engagement signals and make sure your best content keeps performing.
Whether you want to drive traffic, get more conversions, or grow your audience, Bïrch gives you the tools to do it without manual work.
FAQ
What does “boost post” mean on Instagram?
Boosting a post on Instagram means turning it into a paid ad so that it reaches more people beyond your current followers.
How do I boost a post on Instagram?
Click the “boost post” button under the post you want to promote. You can do this in the Instagram app or from your computer.
Can you boost posts on Instagram?
Yes, but not all posts are eligible for boosting. If your post follows Meta’s ad policies and hasn’t already been promoted or archived, you can boost it.
What does a boosted post look like on Instagram?
A boosted post looks just like a regular post but with a “sponsored” label and a call-to-action button like “shop now” or “learn more.”
What does boosting a post on Instagram do?
Boosting helps your content reach new audiences. It can drive more profile visits, website traffic, app installs, or engagement (such as likes and comments).
What does a promoted post on Instagram mean?
A promoted post on Instagram is a regular post you paid to promote to a larger audience. Instagram-promoted posts are labeled “sponsored” and appear in feeds, Stories, and other placements.
What’s the cost of boosting a post on Instagram?
The cost of boosting a post on Instagram depends on your budget. You can boost a post for as little as $1/day, but higher budgets get more reach and impressions.
Can I boost a post on Instagram without using Facebook?
Yes. You can boost directly from the Instagram app without logging into Facebook.
What types of posts can’t be boosted?
You can’t boost carousel posts, Stories with stickers, or anything that’s too old, archived, or has previously been used in another campaign. Posts must also follow ad policies.
Can I boost Instagram Stories?
Yes, but only certain types. You can boost Stories that meet Meta’s requirements—usually video Stories without interactive elements.
How do I boost my post to a specific audience?
When boosting, choose your audience manually. You can select interests, demographics, or custom audiences like website visitors or Instagram engagers.
Can you boost Instagram accounts?
Boosting your entire account all at once isn’t possible, but you can boost individual posts and set the goal to drive more people to your profile. This helps increase visibility, grow your followers, and strengthen your overall Instagram presence.
What is the difference between boosting a post and running an ad?
Boosting is faster and simpler—ideal for top-performing posts. Running ads gives you more control, but takes longer to build and optimize.
How often should I boost posts?
Only boost content that’s already performing well. Instead of boosting every post, focus on the ones that show strong engagement or support a specific goal.
What happened to Revealbot?
Revealbot underwent a comprehensive rebrand and is now known as Bïrch. This transformation reflects our renewed focus on blending automation efficiency with creative collaboration.
Boosting an Instagram post is as easy as clicking a button. Seeing performance is another story.
Learning how to boost Instagram posts the right way can make a huge difference in terms of reach, engagement, and conversions.
In this guide, we’ll walk you through how to boost posts from both the app and desktop, explain why some posts can’t be boosted, and show you how to automate the process with Bïrch (formerly Revealbot).
Key takeaways
- When you boost an Instagram post, it becomes an ad.
- Boosting posts helps you reach more people than just your followers.
- Not all posts are eligible for boosting.
- You can boost posts directly on Instagram or automate them through Bïrch using custom rules.
- Post-boosting works best when you build on content that already performs well.
What does “boost post” mean on Instagram?
Boosting an Instagram post means turning it into an ad to reach more people outside of your follower list.
The feature is designed to help you gain more engagement, reach new potential followers, and effectively promote your content.
How to boost an Instagram post
To boost a post, click the “boost post” button under the post you want to promote. You can do this from the Instagram app or on your computer.
How to boost an Instagram post from the Instagram app
- Select the post you want to boost from your Instagram profile.
- Tap “boost post” on the lower right corner of your post
- Set up your goal, audience, budget, and duration.
- Tap “next.”
- Review your details and tap “boost post.”
Your ad will be submitted for review and will start running once approved.

How to boost an Instagram post from your computer
- Click the post you want to boost.
- Below the image, click “boost post.”
- Set up your ad by choosing the goal, audience, budget, and duration.
- Click “preview ad” to see how your post will appear across placements and adjust Advantage+ creative if needed.
- Click “boost post” to submit it for review.
Once approved, your post will start running as an ad.
Why you might not be able to boost a post
Not seeing the “boost post” option on Instagram? Here are a few common reasons why:
- Your account isn’t a professional account or hasn’t existed for at least 30 days.
- The post doesn’t meet Meta ad policies.
- You have account restrictions or ad rejections.
- The post is too old, archived, or already part of another promotion. Instagram may block boosting for content that’s no longer eligible.
- There’s a technical issue.
So, how can you tackle these obstacles?
- Start by confirming that your account is professional and active.
- Try recreating the post if it was archived or used in a past promotion.
- For policy violations, avoid excessive text in images or restricted keywords.
- If your account has been flagged, check the Account Quality section in Meta’s settings.
- If it seems like a glitch, try updating the app, logging out and back in, or reinstalling to refresh access.
Is it worth it to boost a post on Instagram?
Instagram isn’t just where people scroll for entertainment. It’s also where they discover, search, and shop. With two billion monthly users and high-engagement on-brand content, it’s a platform worth showing up on.
When a post performs well organically, it’s a clear sign that your audience is responding to it. Promoting that post helps you reach even more people—people who are likely to engage—bringing in more likes, followers, and visibility for your brand.
It can also drive traffic to your website, generate new leads, or even lead to app installs—especially when paired with the right call to action.
How to auto-boost posts with Bïrch
You can automatically promote Instagram posts when they meet certain conditions (such as quantity of likes or comments) through Bïrch’s post boosting tool.
Follow these steps:
1. Integrate your Instagram accounts
Integrate your Facebook Insights and Instagram accounts. Click your profile icon in the bottom left corner, go to Integrations, and connect your accounts from there

2. Set post boosting conditions
Once you’ve integrated your Facebook Insights and Instagram page, you can set up post boosting. On the left sidebar, click “post boosting” and select “Instagram” under “page source.”

Select your Instagram page from the drop-down menu, then choose which post types to boost—image, Reel, carousel, or Story. You can boost all types, just a few, or only one. If you want more control over the different types of posts that get promoted at the same time, you can adjust that setting.
Depending on the run time you select in the next step (for example, four days), multiple posts may be boosted at the same time. If you want to limit that amount, select the number under “number of posts promoted at once.”
You can choose the conditions a post needs to meet to be eligible for boosting. Select from a variety of criteria, such as total engagement, likes, comments, saves, impressions, whether the post text includes certain words or emojis, how long ago the post was published, and more.

In the example above, we requested to only boost posts that contain the word “new” and have received more than five comments.
Once the rule is active, you can track its performance in the activity logs. You can see which posts were boosted, which didn’t meet the conditions, and if any errors occurred.
3. Set campaign settings
Here, you’ll be able to name your ad campaigns and choose the campaign objective (the Meta ad campaign objective the algorithm will optimize for).

With macros, you can use dynamic text in your campaign name so that each campaign is unique. In the example above, we used the date the campaign was created as part of the name.
Next, set the campaign objective. It makes sense to create multiple post boosting rules here. You can set different campaign objectives depending on the post type or a keyword that’s included in the post text (for example, “sale” or “limited time”). Within this particular campaign, all posts that meet the rules you have set will have the same chosen objective.
In the above example, we opted for the “engagement” objective. You can read more about campaign objectives in Facebook’s Help Center.
Other settings considerations include whether you want to set the budget at the ad set level or use Meta ads campaign budget optimization to set a campaign spending limit.
4. Configure Instagram ad set settings
On the next page, you can set your ad set naming convention, audience, budget, optimization goal, bid strategy, billing event, campaign run time, and placements. Keep your campaign’s initial goal in mind, whether it’s to increase post engagement or generate purchases.

While most of the options here are self-explanatory, the target audience selection is important.
Bïrch allows you to customize the audience your boosted post is shown to. So, if an organic post does well, you’re not limited to boosting it to your page fans or followers alone. You can boost it to a new audience entirely. This is because, behind the scenes, Bïrch is taking your post ID and creating a new ad using that post as the creative—so you can target custom audiences, lookalike audiences, re-targeting audiences, or saved interest audiences.
When scrolling down this page, you’ll see options for placements.

You can choose automatic or custom placements. We recommend choosing custom placements because your post might look out of place when used in some unsuitable placements.
In our example, we boosted Instagram posts to Facebook and Instagram users in the feed only, but you can also select other placements.
5. Configure ad settings
In ad settings, you can add a website link, call-to-action button, or custom URL parameters. You can also set your conversion tracking settings and set up notifications. With macros available to make your URL parameters dynamic, you’ll know exactly from which post traffic and conversions are coming from.

6. Customize the website link and call to action for boosted posts
Scrolling down, you can configure your conversion tracking settings and set up notifications. You can be notified via email, Facebook Messenger, or Slack by setting up our Slack integration. In the example below, we set it up so that we receive Slack notifications.

4 ways to boost your best content with Bïrch
Once you’ve set up post boosting in Bïrch, the next step is deciding what to boost—and when. Instead of guessing, you can create custom rules that automatically promote the content your audience is already engaging with.
Below are four practical ways to boost your best-performing posts, Reels, and Stories using Bïrch.
1. Turn your best-performing posts into ads
If a post is already getting strong engagement, that’s a clear sign it’s resonating. Instead of letting it fade in the feed, you can turn that post into an ad automatically so that it keeps working for you and reaches more of the right people.
The following example demonstrates boosting a post that includes the word “shop” and has at least 10 comments.

Once the filtering is set, you can customize the ad settings, add a website link, and use the “shop now” call to action.

With this setup, you’re automatically turning your best Instagram posts about your products into conversion ads while keeping that organic engagement on the post. Of course, you would be able to set the audience and placements in this automation to target our middle- and bottom-of-funnel audiences as well.
2. Auto-boost posts with lots of likes
You’ll probably be more inclined to spend money on content that has a proven track record in terms of organic reach. That’s why auto-boosting posts with lots of likes is the most popular way to boost content on Instagram.
To auto-boost a post like this, first, analyze your average engagement rate (likes, swipe-ups, comments) and the average time it takes for your content to gain this engagement.
Using that data, you can specify the number of likes a post needs before it’s boosted.
Let’s say around 900 people on average like your posts and it takes about two days to get all those likes. In that case, you might decide to boost an image, video, or carousel post that gets 1,000+ likes within 48 hours. The formula would look like this:

The audience-targeting and placement will depend on your business and each post’s goals.
3. Auto-boost posts with video that gain lots of views
Boosting videos is as easy as promoting posts, but it involves following a slightly different set of rules. Instagram auto-plays videos and shows a view count by default rather than a like count, so the view count actually tells you people are watching your content.
Let’s say your average video view count is around 3,500 views. You might create an auto-boosting rule like this:

You can also combine a like count and video view count if you wish.
4. Auto-boost Instagram Stories with lots of views
Instagram Stories can include Reels, images, polls, and links, which makes them perfect for re-engaging users and driving traffic to your website and app.
Let’s say you want to boost an Instagram Story that’s a video and has above-average views. Here’s how you can automate that:

A time length restriction is added in the example. That’s because you can save Stories to your profile, and you probably won’t want to include them if they are old.
Tips to improve reach and engagement
These Instagram boosting tips can help drive better results and make sure you’re allocating budget to posts that are actually worth promoting.
- Target people who have already interacted with you. Choose audiences like past website visitors, Instagram engagers, or customer lists to boost content to people more likely to convert.
- Match your campaign goal to what you want people to do. If you’re promoting a product, choose Conversions. For blog posts or landing pages, choose Traffic. For likes or comments, choose Engagement.
- Use placements where your post looks best. Stick to Feed and Stories if your content is designed for mobile. Skip placements like Audience Network where formatting might break.
- Boost posts early, within 24 hours of publishing. This gives your content a better chance to perform while it’s still getting organic reach.
- Create different rules for different post types. Separate videos from carousels and Stories so you can choose the right goal, audience, and budget for each.
- Set a minimum engagement threshold before boosting. For example, you might only boost a post if it gets at least 500 likes or 10 comments within the first day.
- It’s best not to boost posts that aren’t clear or visually clean—for example, those with long captions, low-quality images, or messages that are hard to understand at a glance.
- Start with a small budget and increase spend on content that performs. Avoid putting your full budget behind every post. Scale what’s working.
- Boosting posts just to try and save them is unlikely to work. Use post boosting to amplify content that already shows signs of working well.
Make your best posts work harder
Boosting posts is one of the easiest ways to get more out of the content you’ve already created, especially when you adopt a strategic approach.
With Bïrch, you can automate your post boosting based on real engagement signals and make sure your best content keeps performing.
Whether you want to drive traffic, get more conversions, or grow your audience, Bïrch gives you the tools to do it without manual work.
FAQ
What does “boost post” mean on Instagram?
Boosting a post on Instagram means turning it into a paid ad so that it reaches more people beyond your current followers.
How do I boost a post on Instagram?
Click the “boost post” button under the post you want to promote. You can do this in the Instagram app or from your computer.
Can you boost posts on Instagram?
Yes, but not all posts are eligible for boosting. If your post follows Meta’s ad policies and hasn’t already been promoted or archived, you can boost it.
What does a boosted post look like on Instagram?
A boosted post looks just like a regular post but with a “sponsored” label and a call-to-action button like “shop now” or “learn more.”
What does boosting a post on Instagram do?
Boosting helps your content reach new audiences. It can drive more profile visits, website traffic, app installs, or engagement (such as likes and comments).
What does a promoted post on Instagram mean?
A promoted post on Instagram is a regular post you paid to promote to a larger audience. Instagram-promoted posts are labeled “sponsored” and appear in feeds, Stories, and other placements.
What’s the cost of boosting a post on Instagram?
The cost of boosting a post on Instagram depends on your budget. You can boost a post for as little as $1/day, but higher budgets get more reach and impressions.
Can I boost a post on Instagram without using Facebook?
Yes. You can boost directly from the Instagram app without logging into Facebook.
What types of posts can’t be boosted?
You can’t boost carousel posts, Stories with stickers, or anything that’s too old, archived, or has previously been used in another campaign. Posts must also follow ad policies.
Can I boost Instagram Stories?
Yes, but only certain types. You can boost Stories that meet Meta’s requirements—usually video Stories without interactive elements.
How do I boost my post to a specific audience?
When boosting, choose your audience manually. You can select interests, demographics, or custom audiences like website visitors or Instagram engagers.
Can you boost Instagram accounts?
Boosting your entire account all at once isn’t possible, but you can boost individual posts and set the goal to drive more people to your profile. This helps increase visibility, grow your followers, and strengthen your overall Instagram presence.
What is the difference between boosting a post and running an ad?
Boosting is faster and simpler—ideal for top-performing posts. Running ads gives you more control, but takes longer to build and optimize.
How often should I boost posts?
Only boost content that’s already performing well. Instead of boosting every post, focus on the ones that show strong engagement or support a specific goal.
What happened to Revealbot?
Revealbot underwent a comprehensive rebrand and is now known as Bïrch. This transformation reflects our renewed focus on blending automation efficiency with creative collaboration.


